August 2025
- paddleriver
- Aug 31, 2025
- 6 min read
August 7 2025
The big news this month has to be this little guy. Say hello to Stitch.

We went to a dog show in Okotoks on August 3. Both the breeder of our 3 Shelties, and the breeder that we have recently used to board the dogs, were showing dogs. As we sat in the pouring rain watching the dogs do their thing, the conversation went from “not the right time for another dog” to “not much difference between having three or four”. That was apparently a turning point, and we were suddenly on the road to getting another dog. After helping move dogs from the ring back to the trailers, we spent a few minutes talking with our breeder. Naturally, they had several dogs for sale, from new puppies to some dogs nearing a year old. Marie and Christine both fell in love with a female tri merle, but the breeder recommended we not introduce another female given Ember’s behavioral challenges. So we picked a four month old sable male. He was supposed to have been 50% housebroken but we seem to have brought home the other 50%, suffering numerous accidents in the first day. He is extremely food motivated and has been learning very fast. Three days later and he is starting to let us know when he needs outside. A month after he arrived and he only has accidents in the house if we aren't paying attention when he asks to go out. The other dogs aren't yet certain about him, but Ember and Luna now regularly play with him.
Christine got back mid July from her overseas studies. She diligently started applying for work at area golf courses. It took two weeks of waiting but she eventually got two responses, leading to two interviews on the same day, leading to two job offers. After much debate, she accepted the offer at Elbow Springs Golf Course. She is hoping that her fall course schedule will allow her to keep working, initially on carts until the course closes, and then in the restautant.
Before leaving McMurray, I made sure to visit doctor and dentist. A year later, it was time to repeat the process. It was more eventful than expected. I have been confirmed as having a double hernia, with surgery scheduled November 20. I was also referred to a hearing loss clinic, and have been confirmed to have suffered sufficient hearing loss to justify hearing aides. They are on order and will be fitted the end of September. I am clearly getting older.
We were in Vancouver the third week of August for my nephew's wedding. It was a fun trip and all three kids were able to attend. It rented a condo on the south side, and did a lot of touristy things with the kids, visiting the Capilano suspension bridge, Stanley Park, and Gastown.
There wasn't a lot of time left for modelling, given all the doctors, travel, and watching Stitch. But I still managed to get a little time in at the bench.
Magic Factory A-4N Skyhawk
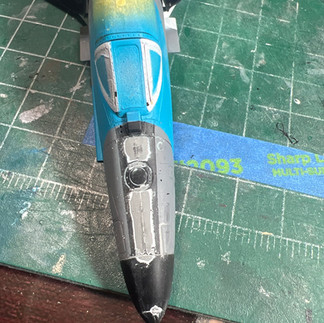
I ordered some track laying materials at the end of July. They still haven't shipped as of the end of August. I initially decided to wait, and work on airplanes, but eventually became impatient and began laying track. When I was waiting, I went back to working on the Spitfire - see below. I needed something to do while the clear coat dried, so restarted work on the Skyhawk. Work began with sanding the damaged paint, affected by thinner used to strip paint, leaked under the masking. The task was made much easier by a motorized sander I bought last fall while visiting Edmonton. It made short work of the sanding, and removed the damaged paint, but I wasn’t happy with the thickness of paint that still remained in the engraved detail. Out came the thinner, used more carefully this time, to remove paint from the engraved panel lines and rivet detail. A light sanding followed to even out the paint edges and give some tooth back to the plastic (see Photo 1).
A ghost seam on the nose became apparent while looking at the plane, resting on the bench, under the bright work lighting. The area was sanded back to bare plastic, black CA used to fill the seam, and the CA sanded down smooth. The seam is very visible in Photo 2 below as the white line running along the length of the nose.
Thinner damaged paint extended to the flap bays interiors. These areas would have been difficult to sand so the paint was stripped back to bare plastic and redone. For some reason, the paint on the left side was perfect, while the paint on the right side had multiple fish eyes. The right side was restripped and then successfully repainted.
Photo 1 - Damaged white paint, stripped for the second time.
Photo 2 - Ghost seam repair in progress.
Photo 3 - One flap bay repainted. One stripped for the second time, ready to repaint again.


1/24 Airfix Spitfire
Work resumed on the Spitfire while waiting for some track laying materials to arrive. Stencil decals have been finished and a clear coat applied.

Somehow one of the cannons had been misplaced. An hour searching couldn't find it. Fortunately the kit includes two spares, so one was glued together and painted.
Next step will be to apply weathering.
Railway
I got impatient waiting for the track laying supplies, and decided it wouldn't hurt to lay some track.
After saying I wanted to reuse as much of the existing layout as possible, I started over.

As noted in the last blog, the right end module had been flipped over, after deciding it would be easier to restart than to remove the four existing turnouts. A couple of rainy days gave time to focus on the railway and good progress was made. Cork roadbed was laid on the right end module, and ties were glued down on the center module. Cork and ties were now complete across all three modules. I took a moment to admire the completed work, looking down the length of the railway from the right end, when I realized the newly cork/ties looked more like a dog’s hind leg than nice straight track. The cork/ties were aligned differently across each of the three modules, creating a noticeable zigzag pattern along the full length. It wasn’t noticeable from the front but was so apparent when looking down the length. A number of options were debated before it was decided it would be easiest to start over.
Freshly laid ties on the left end module were pulled up and the plywood flipped over. Cork was laid on the left end and center modules. To keep things straight, a string line was set across the full length. This was used to draw straight track centerlines across all three modules. With confirmed straight centerlines in place, ties were laid along all three modules.
Tie laying progressed quickly, with about 600 ties glued down before the first bag was empty. The next bag was grabbed and ties were laid. Except the new ties were longer than the previously laid ones. I looked at the new package and discovered they were 9 ft long bridge ties. I grabbed the empty bag from the garbage and discovered that they were 8 ft long. A check of the third bag found they were 8'-6" long. Standard railway ties are 7”x9”x8’-6”. The three bags had been bought at different times. Two bags were purchased from the used bins at Trains & Such, while the third was recently purchased. It was assumed that they were all the same size. I have no idea why the first bag was 8’ long, or where the real railroads would use these shortie ties, but I now had about 600 of these shorter ties glued in place.
I no longer had enough 8" ties to finish the first row. A trip to Trains & Such exchanged the too long bridge ties but they were out of ties. I had already pulled up ties twice, and really didn’t feel like pulling up another 600 ties.
Would anyone notice an 8’ tie next to an 8’-6” tie? Well, yes. It was very noticeable when the two were placed side by side. It was much less noticeable when a row of 8’ ties were laid parallel to a row of 8’-6” ties. So it was decided to finish the existing row of 8' long ties, and then start the next row using the longer 8'-6" ties.
That’s how ended up I spending two days labouriously removed cork bits and glue from previously used ties, painstaking sliced/scrapped off using a razor blade. It left some strange dents in my fingers, from holding the ties while slicing, but I got enough to finish a full length. With that, ties are laid for the entire Oulton yard.
Part of the track order is cast frogs, a key component of a switch, and I didn’t want to get too far ahead until I had at least one of these in place to figure out spacing. So track laying tentatively began with a short segment, mainly to get something down and see how it looked, but still easy enough to shift laterally if needed. Photo 2 below shows the short length in place and a tank car used to check the work.
Photo 1 - Ties laid and stained - the second time
Photo 2 - First rail laid
Photo 3 - Almost finished the main yard track.


Well, that's it for another month. Stay safe everyone.


Comments