End of October 2023
- paddleriver
- Oct 22, 2023
- 10 min read
It has been pretty quiet the last few weeks.
Marie was down in Calgary, right after Thanksgiving, to help her mom with some medical appointments. She got home Tuesday with the start of a brutal cold. She spent the last several days eating soup and trying to get extra sleep.
As our trees have matured, the amount of leaves to rake hasincreased. A lot. I ended up raking the front and back yards four times this fall. I used to mow to collect the leaves but the last few years there have been too many leaves and the mower simply clogs up. When all was and done, it needed 22 leaf bags to collect them all. Yes, I was counting.
The weather after thanksgiving was beautiful, with warm temperatures well above normal. It made for some very pleasant bike rides and I took full advantage of it. It was just a matter of time before the weather became more seasonal so I spent a couple days putting the Christmas lights up in the trees, and getting the winter tires on. With the Vibe and Venza now gone, there was only one vehicle to do. It was strange but pleasant to change the tires in shirt sleeves. Two days later the temperature dropped and the snow arrived.
I got my flu and covid shots shortly after they became available. Marie was still fighting her cold, so she didn't go.
Christine continues to put in big hours on her studies. I don't know how she does it, but it is paying off with continued good marks.
Nicholas has finished his mid terms and thinks he did well. He is celebrating by spending some of his reading week in Montreal with Jill.
Daniel seems to live at the university, working on the F1 EV. They are making progress, as he shared a picture of their first of eight battery packs.
CF-104 Starfighter
Nope. Didn't get around to taking the promised final pictures
Lightning
I'm going to try a different picture layout this post. I had been browsing another blog and liked the way the pictures were laid out. Let me know if you prefer the new or old way.

Oil paint sludge wash, using a mix of Abieltung "starship sludge" and oderless turpenoid, had been applied. It will be allowed to dry for an hour before being wiped off with Q-Tips and paper towel. Enough time to walk the dogs!

The wash has been wiped off and blended in. The picture doesn't capture the effect very well. The oil has toned down the red and settled into the panel lines and details, leaving a patina of nice overall dirt and grime.

The real plane was the squadron commander's personal jet. These are generally kept very clean, if not spotless, but photos show this plane was allowed to get a little dirty and faded. Oil paint pin washes and dot filters were user to replicate fuel spills, oil leaks and maintenance staining. The effect is subtle and hard to capture as the above photo shows.
The plane now needs a few days for the oil paint to dry, then a matt clear finish will be applied to seal the decals and weathering
Fokker Trimotor
The Fokker is on the verge of being finished.

Photos of the real plane show reflections on the fuselage and underside of the wings, suggesting the paint was glossy. Personal preference is to use a flat clear coat on model planes, as too much shine makes them looks toy like. A compromise was made and a semi gloss was used. Four light costs of Tamiya semi gloss clear were applied. Just the silver window frames and third motor to finish.

The silver window frames were done with thin strips of Bare Metal Foil. This was the first time I have used this self adhesive foil and I had a bear of a time. None of the frames are particularly accessible, making it difficult to accurately place each strip. Once in place, the stripes wouldn't stick. They could be burnished down, everyone looked fine, and then they would move when the adjacent pieces were placed. After many tries, the frames were finally finished.
That essentially finishes the model. This kit took a lot more time and effort than expected. It is pretty crude in spots, and the very hard plastic was a challenge to work with. That said, it was a good learning experience, taught me some new skills and let me experiment with some new-to-me products. The finished model certainly isn't perfect, but looks fine from 3 ft away and makes for a distinctive model for my shelves. Pretty good for a $10 kit! I will get some pictures for the next blog update.
Bellanca Pacemaker x2
With a move expected next year, these next two models will probably be the last kits finished in Fort McMurray. That's a pretty strong incentive to get on with some local content.
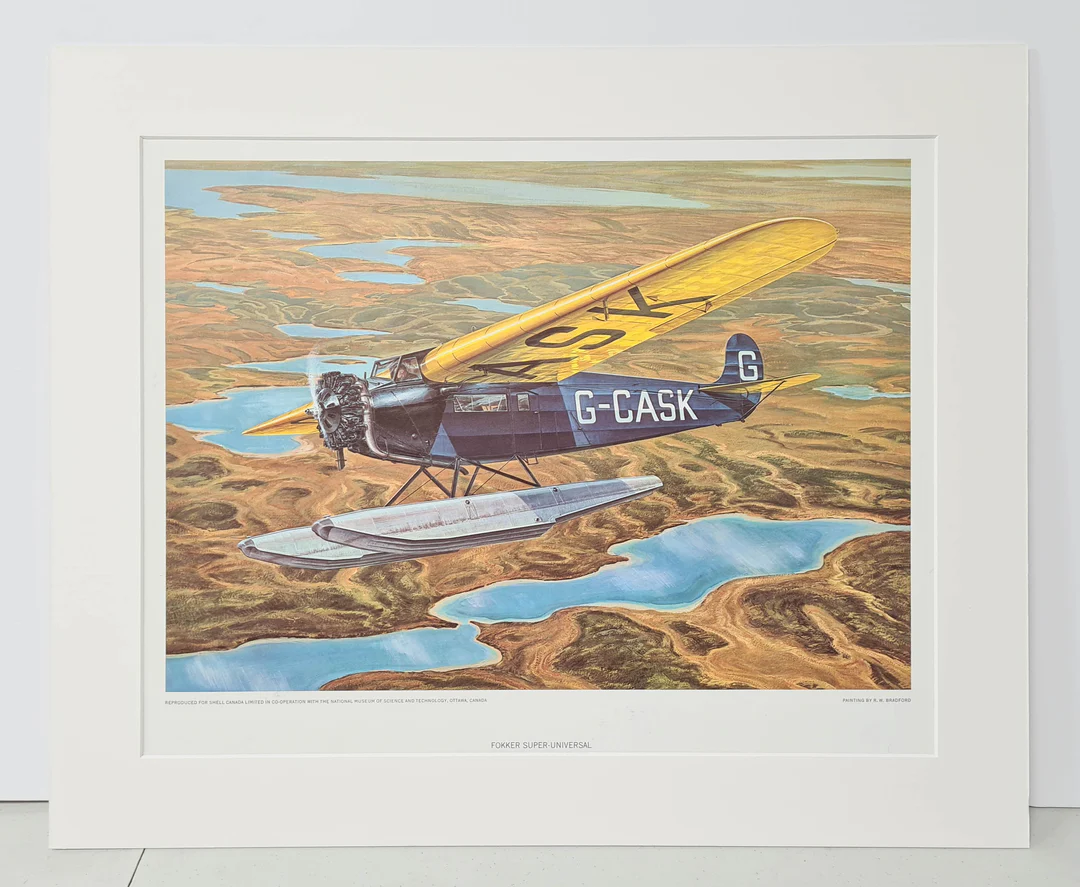
There are two planes, or perhaps two pilots, that i immediately associate with Fort McMurray. The first is Bellanca Pacemaker CF-AKI, flown by Wop May. The second is Fokker Super Universal C-GASK, flown by Punch Dickens. CF-AKI flew the first air mail from Fort McMurray to the north, and played a major role in resolving the Mad Trapper incident. Punch Dickens, flying G-CASK, was instrumental in opening up and mapping the north.


I have kits for both planes. I actually have three Pacemaker kits; two injection moulded plastic kits from Dora Wings, and a vac form kit from Khee Kha Art Products, all in 1/72. (Hmmm, my database says I have two of the vac form kits but I don't know why I would ). The Super Universal is a delicate looking 1/72 resin kit from Aeroporto. I have doubts that the Fokker Super Universal would survive a move, so it will be saved to be built as the first kit post move. This will therefore be a dual build of an injection moulded kit and a vac form kit of Bellanca Pacemakers. One will be done as a ski equipped plane in the blue and orange of Canadian Airways, as it appeared during the Mad Trapper incident. The other will be an overall yellow plane, in RCAF markings, on floats.
I do not have skis so this will my excuse to learn 3D printing and make some skis. I also do not have airfoil shaped struts to connect the floats to the plane, so will have to figure out a way to scratchbuilt something appropriate.
Pacemakers trigger my Canadian criteria in several ways. They set a number of distance records, with one crossing the Atlantic less than two weeks after the Lindberg. They were prized for their rugged construction and reliability, making them natural bush planes. Initial deliveries, including the first 7 planes to the RCAF, were from the US. An apparent desire to open a Canadian manufacturing facility saw 6 additional planes constructed for the RCAF, under license, by Canadian Vickers in Port Arthur (Thunder Bay). The RCAF was the largest operator of the type with 13 planes, obtained in two orders, with the final order of 6 being the only planes to be constructed by Canadian Vickers.
Pacemakers were extensively used by several companies to transport people and cargo throughout the north. The RCAF used them extensively to map northern Canada, and they were commonly mounted on floats. More details on the Pacemaker can be found here on Wikipedia https://en.m.wikipedia.org/wiki/Bellanca_CH-300_Pacemaker
Pacemakers underwent many modifications, both during the production run, and in the field, making it important to have pictures of the planes being modelled. The two planned builds will be noticeably different even though they are supposedly the same plane.
Khee Kha Pacemaker
Khee Kha Art Products is a small producer of northern bush plane kits, including vacuum form kits, resin engines and resin floats. The company is owed by Lars Opland, located in Alaska, who is extremely knowledgeable, and very helpful, on northern bush planes.
The kit was purchased in 2006, along with appropriate floats. Decal sets on hand include Wop May's CF-AKI in the earlier orange Commercial Airways, and the later blue and orange Canadian Airways scheme. A second decal set has schemes for an Austin Airways and Quebec Airways planes. The intent is to build this kit on skis, in the Canadian Airways scheme, as it would have appeared when used in the hunt for the Mad Trapper. As a FYI, I read the book Hunt for the Mad Trapper of Red River, in grade 5 or 6, and it left an indelible impression on me.
CF-AKI was a standard Pacemaker, but the aft fuselage windows were rectangular rather than the more common oval. I can't find any evidence that this plane had windows above the cockpit.
A personal note about this plane. My maternal grandparents visited us the year after we moved to Fort McMurray. My grandfather trapped in the Fort Smith area during the 1920's, using Fort McMurray as a supply base and starting point. Later he would work summers here on the boats, working up to first mate on the Northern Echo. After my grandparents were married, they would take the train to Mcmurray and then canoe to the Fort Smith trapline. We took them to Heritage Park, where they pointed to pictures of people and places they knew. Wop May, Punch Dickens and Dr Karl Clark were all familiar to them, and they recalled seeing May's and Dicken's planes, and Clark's boat.
The kit's parts are quite simple. The first photo shows the single styrene sheet, with all the necessary parts, including seats and an instrumental panel. The second photo shows the backside of the sheet, with a very nice cast resin prop, cowling and engine, a vac formed front windshield, and a piece of clear acetate to cut side windows from. The third photo shows the parts after being outlined with black marker.


The first step in building a vac form kit is to separate the parts from the backing sheet by carefully cutting around each part. It is easier, and safer, to repeatedly score around each part, slowly deepening the cut, until the part is released. Straight parts can be scored partway thru the backing sheet, then snapped free from the backing sheet by repeatedly bending the cut line.
Once free, it is necessary to sand the part to get to the final thickness. The black marker helps by showing the correct thickness. Any white plastic showing under the black marker lines is excess and needs to be removed. The part is at correct thickness when no white plastic shows below the marker line.

The picture above shows the two fuselage halves cut out and sanded to final shape. The window openings have been cut out and clear plastic windows made and inserted. The tape on the windows keeps track of where each window goes, and it's orientation, so they can be later refit. The upper half had a visible repair at the tail, where too much material was removed. This had taken about 6 hours to complete. The instructions suggest you take your time and enjoy the build, as it is not a weekend kit!
Dora Wings Pacemaker
Dora Wings is an Ukrainian company manufacturing an esoteric range of lesser know European planes. Their Pacemaker kits, with three different boxings, are for Eastern European planes used to set various distance and endurance records. The kit features fine details and crisp mouldings.
The original intent was to use this kit as a guide to help with building the vac form kit. Reading online reviews suggest the Dora kit goes together well but has a number of inaccuracies the Khee Kha kit doesn't. So the two will be compared during construction as a means to make both models more accurate.
The initial thought was to build this kit as CF-AKI on floats. That is still very tempting but I have been slowly leaning towards building it as a RCAF machine on floats instead. Studying photos had found two key differences that will need to be accommodated. RCAF planes have the enlarged vertical stabilizer common to later CH-400 Skyrockets. The RCAF planes also had the aft window, on both sides, enlarged to allow aft pointing camera to be installed. Pictures suggest the RCAF planes also did not have windows above the cockpit.
RCAF planes were overall yellow, with a black engine cowling. Floats and struts were silver. Markings were very simple, with roundels on the aft fuselage and underside of the wings. Registration/ID numbers were located on the rear fuselage, behind the roundel, and the underside of the wing, inboard of the struts. I don't currently have decals but it shouldn't be too difficult to cut masks.

Kit sprues. This is an earlier boxing, and seems to be free of flash and mould offset that may affect later boxings. The kit also includes a small photoetch fret and clear parts for the windows. Note that the fuselage sides are solid. Windows are marked on the inside of the fuselage and have to be cut out.
The first thing you notice is that the part numbers aren't marked on the sprue, next to the part. Instead it is necessary to refer to a parts map on the first page of the instructions. An inconvenience but not the end of the world.
Online reviews indicate the cabin floor and is too wide, preventing the fuselage halves from closing. A quick dry fit suggests this kit is okay. The dry fit also found it would be beneficial to have four hands to keep all the pieces together and aligned.

First step was to prep the fuselage halves. The cabin windows are solid, but marked on the inside of the fuselage. The edges of the required openings were chain drilled to start the removal process. Oh, the little indents above the windows are apparently alignment holes for the alignment pins on the wings. Except the wings are outside the fuselage while the indents are inside. I will drill them out and then use brass rod to pin the wings to the fuselage.

A sharp knife was then used to trim the waste out. The fuselage interior as markings to show where to cut the windows, with an exterior a Teri Suggesting interior. First thought is you should file to the interior edge, using the resulting lip for the window casting to sit on. Unfortunately, you would be wrong. The plastic windows are flat, right to the edges. Test fitting the windows discovers they aren't sized to fit either the interior or exterior openings but somewhere in between. An hour and a half of careful filing and the windows for one side are in place. The tape with letters keeps track of what window fits where, and which way is up.

Port side fuselage with a door scribed in and new rear camera window cut. Two attempts were needed to make a camera window from an old CD cover.

Cabin interior. The instructions, showing how the kit is supposed to be put together, is on the left. My version is on the right. I have not found any pictures of a RCAF interior looking forward. A poor midsection picture seems to show two seat backs at the front, verses the kit's front bench seat. Two seats make more sense as it appears cockpit entry was via the rear doors, meaning a bench seat would block passage. The kit's bench seat was repurposed as a camera shelf. A really good pair of black and white photos showed the camera setup at the rear of a Pacemaker. Two window mounted cameras were used initially. A rear facing camera was later mounted thru the floor, protected by a fairing on the plane's underside. I took the easy way way out and went with the two camera setup, using cameras made from wood scraps.
And that's it for this update. Have a great week and stay safe.


Comments