End of September
- paddleriver
- Sep 26, 2021
- 3 min read
Coming up to the end of September. Weather has been nice but it is now almost dark when I walk the dogs after supper. No frost yet but there have been a couple evenings that got close.
Northstar
All the Northstar photos, and in particular any of Trans Canada Airlines (TCA) planes, show a shiny metal fuselage. The front of the engine cowlings also appear shinier than the rear of the cowlings. I have not found any good pictures looking down on to the top of the wings, so I decided to take some artistic license. I painted the main fuselage and the cowlings in Alclad Airframe Aluminum over a gloss black base. The front of the wings and stabilizers, top and bottom, as well as the fairing of the wings into the fuselage, was painted Alclad Duraluminum. Finally, the control surfaces were painted with Aclad Semi Matt Aluminum. In concept very easy. In reality, it needed more than two hours masking to prep for the Duraluminum, and another hour to mask for the Semi Matt Aluminum. In both instances, it took longer to clean the airbrush than it did to paint the respective aluminum finish. But, when the masking was removed, the results were worth it. Other than a couple small areas on the wings were the tape pulled up paint, the masking did what it was supposed to.
The one surprise was the areas I had masked for the deicer boots. I had cut masks using Oracal 810. This version is intended for use with acrylics. I had read that it didn’t work well with lacquers, and Alclad is an especially “hot” lacquer. I thought it would be okay, as I would be using very thin, light coats that would dry very quickly. Unfortunately, I was wrong, and the paint reacted with the Oracal adhesive, leaving behind either softened paint or a sticky residue. I was able to clean most of it off, then left it to dry for a couple days to see if the paint would reharden. A lesson learned for next time!
Photos 1 & 2 - Airframe Aluminum masked and ready to spray the Duraluminum. Two hours to mask it.
Photos 3 & 4 - Masking removed to show the various metal colours. It is very hard to take good pictures as the shiny metal finish affects the camera.
Next up will be to touch up the areas where paint was lifted, fix the black deicer boots, and apply a clear coat to protect the metal finish.


Hawker Typhoon
Construction progressed quickly once the cockpit painting was finished.
Initial test fits with the resin cockpit installed in the fuselage suggested that it fit well. A final test fit, completed once the cockpit parts were glued together, found that the resin cockpit was slightly too wide. A Dremel was used to grind away a small flange on the fuselage sidewall, intended to hold the kit cockpit. With this removed, the cockpit fit snugly.
Gluing up the fuselage confirmed that the fuselage inserts would leave large gaps ahead and behind the cockpit. A little stretched sprue, inserted into the gaps, did the trick. It proved to be a solid base for a smear of filler to level everything out.
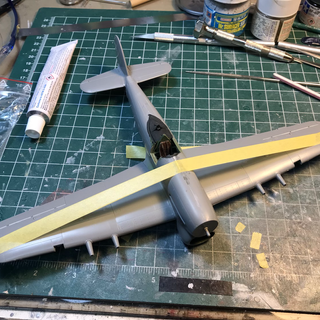
Wings and stabilizers fit well. It was necessary to use some tape to pull the wings slightly upwards, closing a small gap at the wing to fuselage joint. A small amount of filler may still be needed once the tape is removed.
I haven’t decided to leave the car door open or close it up. Going to have to decide soon so that the correct parts can be installed. I had initially thought to leave the door open, as the car door looks so different from a “traditional” cockpit. I have been having some second thoughts and may decide to close everything up.
Next up will be to remove the kit cannon fairings and install the Master turned aluminum barrels. The kit cannons actually look pretty good, but the turned aluminum versions are really crisp and will look good when installed.
Photo 1 - the completed cockpit has been inserted into the fuselage, and the wings added, to test fit. Things proved a little snug and it was necessary to grind a little plastic from the port fuselage side. The large gaps in front and behind the cockpit are visible.
Photo 2 - The cockpit is installed in the fuselage half. The fuselage cockpit opening is rather small, meaning almost nome of this will be ever seen again!
Photo 3 - Fuselage and wings glued up. Tape has been used to close small gaps at the wing roots.


That’s all for now.


Comments