January 2025
- paddleriver
- Jan 24, 2025
- 12 min read
Happy New Year! Wishing you all the best for 2025! And Happy Birthday to Nicholas and Daniel, who turned 24 on January 23rd!
Marie and I had a quiet New Year’s Eve, staying home while the kids went out. They all went to the Flames game. After the game, Nicholas and Jill attended a party at the Saddledome, thanks to the party tickets given to them by people sitting next to them. Daniel and Christine hit the downtown bars.
Marie had been looking for family things to do over the holidays, and came up with several great ideas. First up was an evening where we made stained glass appetizer plates. A few days later, we all headed west for brunch in the dome at the Banff Springs. Marie and I had done this several years ago as part of our 30th anniversary trip, and thought it would be fun to take the kids. The day we went was rather cold day, giving the portable heaters a real workout, but we had a great time.
Jill headed back east late on the evening of the 3rd. Nicholas headed back home to Edmonton the morning of the 4th, while Daniel headed out on his month long Asian adventure later the same afternoon. Christine resumed university on the 6th, starting with a block week course and then starting full courses on the 13th.
Nicholas came back to Calgary on the 12th and worked remotely for a few days until he left to join Daniel really, really early on the morning of the 16th. We have been getting a few pictures from Daniel, after considerable prompting from his mother, and it looks like he is having a great time. He spent his first few days in the Philippines, and the pictures have been spectacular. He left for Indonesia on the 12th, and will spend a few days there before he meets up with Nicholas in Indonesia. After a couple days there, the headed to Singapore for a few days, then flew to Thailand. They will celebrate their 24th birthday together at a Bali resort, and treated themselves to custom made suits!
The last couple weeks, Marie has been slowly putting away the Christmas decorations. The house always looks so full when the decorations are up, but looks so empty when they come down. I am not in any rush to see them go this year, as I will have to start painting the living and dining rooms once they are gone.
Bristol Bolingbroke
Not quite sure why but the instructions started construction with the wing and main landing gear. The result didn’t seem worth a picture. That became an unfortunate theme as I didn't seem to take many pictures as construction progressed.
Construction moved on to the cockpit. Construction of the cockpit followed traditional practices. The pilot’s seat was built up from 5 parts. This was then joined to the rear bulkhead, and the navigator's seat was added. The front of the cockpit includes a bench cushion for the navigator’s work station. The result was spartan but so was the real plane. I like adding crew to my models, and the kit included a pilot figure. He is either malnourished or very short, since he looked a little on the small side when placed in the seat. The size wasn’t as apparent once the seat was placed into the cockpit. The pilot is painted in tan rather than traditional RAF blue, as this seemed to be the prevalent colour for BCATP crew coveralls.
The Blenheim has a very distinct front end, and needed 4 pieces to duplicate it - two cockpit side windows, a navigator’s front window, and the top of the cockpit. I had a lot of trouble fitting the two side windows. No matter what I did, the small oval windows behind the pilot refused to sit flush. I ended up cutting the port side oval window from the rest of the window casting, adding it separately, because I couldn't get it to fit. CA was used to glue it in place and then fill in the large gaps. Some Bolingbroke’s didn’t include these small oval windows, but they appear to be on the plane being modelled. I had previously purchased a Yahu photo etched panel, and it looked really good in place. It might even be seen once the cockpit is all closed up. Seat belts were fabricated from Tamiya tape and added to the navigator’s stool, with more tape strips cut and fit to hold the pilot in.
Photo 1 - The two halves of the cockpit
Photo 2 - The PE panel is sort of visible
Photo 3 - Ready to close up the fuselage


A test fit of all the cockpit pieces determined that the spiffy Yahu instrument PE fouled the upper canopy. I don't think anything was installed wrong but it was necessary to lower the instrument panel. A couple of quick nips with the cutters took the top off the PE panel, solving the fit problem, but didn’t do much for the panel’s aesthetics. Oh, well, you can’t really see much through the canopy.
Fitting all four canopy pieces needed four hands. A dry fit proved it could be done, but but it would need filler in several places. The largest gaps were filled with a couple strips of styrene HO 1”x4”. Krystal Klear was used to fill the smaller gaps.
Next was to join the front and back fuselage sections to the wings. I must have had something in the wings misaligned slightly, as it was very difficult to get good joints between the fuselage front section and the wings. Several spots, especially underneath in the bomb bay, needed a lot of sanding to sit flush. I smartly decided not to glue the rear of the canopy to allow alignment to be adjusted once the fuselage and wings were joined, and it proved a good move. Even still, aligning the top of the canopy to the top of the fuselage was still problematic. Holding the rear of the canopy in position, while the glue set, required so much force it split the bottom fuselage to wing joint.
Photo 1 - The front, back and wing assemblies laid out and ready to assemble.
Photo 2 - Some clean up will be required between the canopy sections and the fuselage
Photo 3 - A good mask set sure came in handy to mask the complex greenhouse.


An interior green colour was applied to the canopy to represent the internal colour. The paint highlighted a number of areas needing repair, particularly the joints between the various clear parts. Mr. Dissolved Putty and some very careful sanding got rid of the gaps. I ran into some challenges with the masks sticking as the Gauzy Agent, a clear coat substitute for Future, stuck to the mask rather than the clear parts. It was necessary to recut several of the masks, seen as lighter yellow in photo 2 below.
The bomb bay doors consisted of a single piece that dropped into the underside opening. Fit was poor, likely the result of errors I made gluing the wings and fuselage together. Filler and a lot of sanding was needed to reduce gaps and improve fit.
With the fuselage completed, attention turned to the engines. The engine cowlings are constructed of three semicircular pieces, with the front cowling ring added separately. The engines are constructed first, and then the cowlings are built up around them. The bottom cowling piece didn’t fit very well, and I had a difficult time getting it to sit properly. Hindsight shows I should have spent more time to improve the fit, as it affected the addition of the remaining two cowling pieces. I wanted to keep the front of the cowling separate to simplify painting, but the fit wasn’t good enough to risk adding it later. More careful filling and sanding was needed to get something respectable.
Photo 1 - Interior colour applied, showing numerous repair areas
Photo 2 - Repairs complete and canopy respirated
Photo 3 - The bomb bay needed a lot of filling, sanding and rescribing
Photo 4 - The engine cowlings were a challenge to build
Photo 5 - Getting close to primer.
Photo 6 - Primed in pink


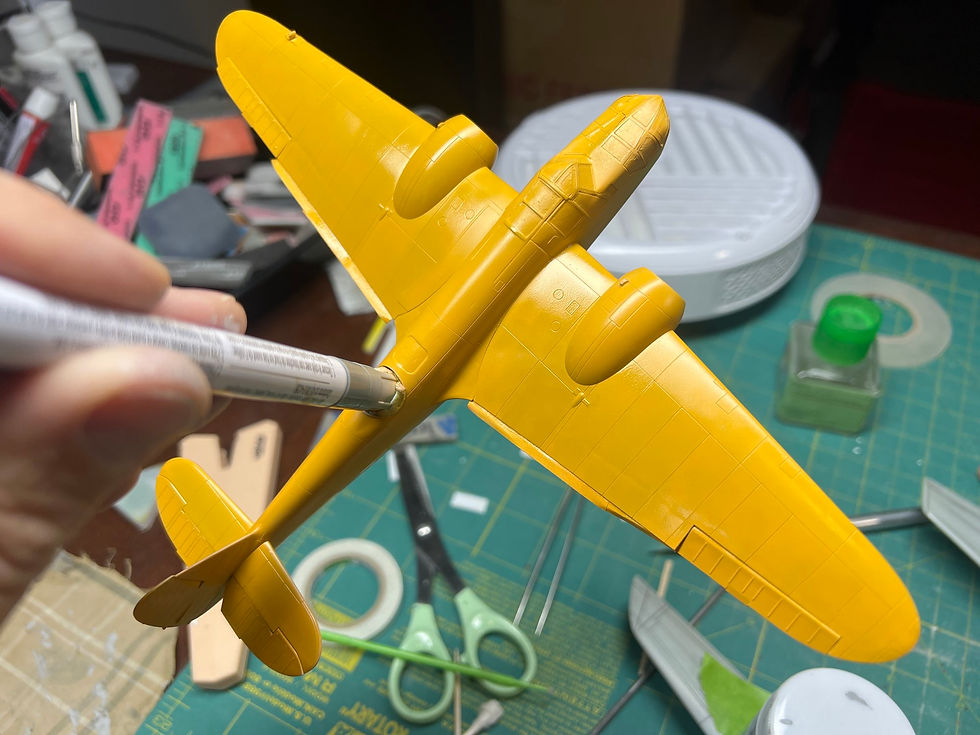
Yellow paint typically has poor coverage, and can require a lot of coats to get decent colour density. I have successfully used pink as a primer, helping reduce the number of yellow coats needed. With the pink primer in place, the entire plane was sprayed with Model Master RAF Trainer Yellow. The first coat went on really well, but had a few inevitable dust motes and repairs. These sanded out well but left the paint darker than the surrounding areas. The yellow refused to cover the darker areas and they remained visible after a second yellow coat was applied. Enamel paints can usually be sanded and recoated after a day, but this 2nd yellow coat has taken an unusually long time to dry. An initial attempt to sand out dust on one of the cowlings, after 3 days drying. caused the paint to ball up rather than sand. It has now been 5 days and there is still a noticeable paint smell. I will give it a few more days to dry before trying any further sanding.
Fokker Super Universal
No progress this month. I am just not ready to do battle with the scribing yet. The wings have been refilled and sanded but need to be scribed to restore the panel lines, and I wasn’t feeling up to it. Very ironic given what’s below.
CC-137 Husky
I need to break a bad habit of doing research rather than going downstairs and building models. Perhaps this time it will result in a more accurate model. I will explain shortly.
The CC-137 was the Canadian designation for the five Boeing 707 aircraft used as general and VIP transport, as well as for air-to-air refueling. KC-135's were originally considered to replace the Yukons and Cosmopolitans when the option appeared to take over a cancelled Western Airlines order for four 707's. A fifth plane was ordered shortly after. The planes were standard 707-320C, in a dual purpose passenger/freighter configuration, with strengthened floors and a large cargo door just behind the cockpit.
Back to the comment about research. I was given a 1/144 Minicraft 707 as a Christmas present, from my parents, quite a few years ago. It was a specific ask and my intent was to convert it into a RCAF plane. The kit was frequently on the list of next to build, getting so far as ordering the appropriate CanMilAir decals. Initial research discovered that a 707 was not just a 707. There were numerous variants, with all sorts of differences. Research got far enough to realize that the engines provided in my kit were the wrong type. That’s when the build stalled out.
A set of appropriate set of resin engines was found online and purchased in 2021, putting the kit back into the ready-to-build pile. More research found that the Minicraft kit was renowned for errors and mistakes, with the main landing gear stance and nose/cockpit shape frequently mentioned. Other problems included errors in the wings, a significantly undersized vertical stabilizer, and errors in the kit engines and pylons. Once again, the build stalled out.
I came across a different version of the Minicraft kit at the 2022 Alberta Open model show, marked on the box as the correct version, for a decent price. It was quickly purchased and, with a supposedly accurate kit in hand, the build moved back up the priority list.
More procrastination research found that Minicraft 707 kits are a dog’s breakfast of different parts and versions, regardless of what’s printed on the box. Sure enough, my two kits had different wings and engines. Sorting through the various differences, it appears the kit bought in 2022 has the correct wings and a mostly correct fuselage. The new kit's engines appear correct, but online references suggest the fit was awful, so the resin engines will be used instead.
Something didn't seem right as I sorted through the two kits, and I finally realize that the fuselage seemed to have extensive “oil canning”. It might be the age of the moulds but the panel lines seemed sunken, while the areas between the panel lines bulged outwards, resulting in a series of hills and valleys. Closer inspection showed that the wings showed the same issue. The second kit was pulled out and checked to find it too had similar oil canning, especially on the wings but perhaps less so on the fuselage. I debated about switching the fuselages, but decided to first see if the effect could be sanded out.
I hadn't really planned to start the kit, but soon enough I was busy standing parts. Sanding started on the bottom of the wings, and greatly reduced the effect. It also reduced the panel lines, sometimes even removing them. I don’t like rescribing, as I haven’t gotten the hang of it yet and tend to make a mess. But a flat wing, with lots of straight lines, seemed like a good place to give it a go. I started by using black Tamiya panel liner to highlight the existing lines and make them easier to see. The rescribing went fairly quickly, and proved easier than I thought. The key proved to be taking taking several light passes, letting the tool do the work. It took about an hour to rescribed all four wings. Tamiya panel liner was reapplied to the new panel lines to check accuracy. A couple of repairs were needed but overall it went well.
With the wings sorted, work started on the vertical stabilizer. I figured it would be easier to complete the sanding and rescribing if the tail could be laid flat on the workbench. But there was no easy way to rescribed the fuselage, so it was decided to rescribed it after the two halves were joined.
The kit doesn’t include any cockpit detail, and none was added, as I planned to use the windshield decals. This meant official construction started with the joining of the two fuselage halves. Fit of the the two halves wasn’t great, with noticeable offsets across the top and tail. Selective cutting of some alignment pins helped improve the fit and reduce the offset. Additional test fitting found that the two halves also weren’t round, especially along the top, causing the two halves to meet at an angle. Thin strips of styrene were added on the insides in an effort to provide some support and hopefully reduce the amount of filler needed. Large amounts of black CA was still needed to fill seams.
With the fuselage halves joined and sanded, it was time to rescribed panel lines. A hard straight edge was tried as a scribing guide, but didn’t work well on the round surface. An assortment of tapes was pulled out to guide the scriber. The round surface wasn’t as easy to rescribed as the wings, and the circumferential joints were particularly difficult. I ended up using a fine saw blade on these as I couldn’t get the scriber to track straight. The end result turned out reasonably well. I don’t know it would pass muster under a metal finish but should look okay under paint.
I tried rescribing the various doors but wasn't happy with the result. After some debate, I decided to fill in the various door details and use decals instead. The RCAF decal set has decals for the main doors, while a 2nd detail decal sets includes all the loading and cargo doors.
I decided to move onto the engines, thinking it would be easier to sort them out and join them to the wing while the wings were still separate. I was disappointed after the first real examination of the replacement resin engines. There were obviously cast using the kit engines, to the extent they even included the kit engine sink marks . The moulding wasn't very crisp, with poor shape and misalignment, with resin blobs on the left side of the engine pylon, on all four engines, that didn't exist on the real engine. And all four of the pylons were warped or twisted. About the only good thing about them was that the front of the engine cowling was round. Nothing impossible to fix but it would take some effort. Time to have a look at the kit engines.
The kit engines consist of 5 parts each - an intake and exhaust fan, two halves split vertically, and the pylon. Fit of the halves was just okay, but it quickly became apparent, after apply glue to the first engine parts, that the halves were oval instead of round. It was particularly noticeable at the front of the intake, where it was obviously elliptical. It might have been possible to improve the shape, if it had been noticed earlier, but I had already applied glue. I decided to place a clothespin across the top of the joint, cross my fingers, and let the glue set. Happily, it worked. The seams would definitely need filler, and some work would be needed at the intake front, but it now looked more manageable than trying to sort out the resin versions.
Photo 1 - Initial sanding complete. Panel lines darkened but not rescribed.
Photo 2 - Top wing rescribed and panel lines darkened. Bottom wing sanded and panel lines have been darkened but not rescribed
Photo 3 - Completed fuselage, rescribed and sanded smooth
Photo 4 - Completed wings, rescribed and sanded smooth.
Photo 5 - Two of the resin engines. Pinholes in the lower one. Resin blob on top of the cowl, near the front of the pylon, on the upper one.
Photo 6 - Heavily reworked kit engines. The intakes are now mostly round.


Trial fit of the engines to the wings showed a better than expected fit, but the engines definitely had a nose up attitude. Bending the rear of the pylons helped, resulting in a manageable gap along the front pylon edge.
Fit of the wings to the fuselage wasn't great. There were noticeable gaps along both the top and bottom joints, on both sides. A lot of sanding and scraping reduced the gaps, but filler would definitely be needed. It was decided this would be easier without the engines installed. A simple jig was created and the wings were glued.

That's it for another month. Take care and be safe.


Comments