January 21, 2022
- paddleriver
- Jan 21, 2022
- 4 min read
This post was originally dated January 9, and was started the last week of 2021. I hadn’t realized how far behind my posts had become.
The last week of December thru to the the end of the second week in January was really cold. All three kids were home for Christmas but began to go their separate ways by the end of the first week of January. We got Daniel settled into his new apartment and all ready for his first co-op day at Suncor on the 10th. Also did a late Christmas visit with my parents and Marie's mother. Just in time too, as my mother texted the next day that there is a suspected case of Covid in their building and they are no longer allowed visitors. Unfortunately, both my parents subsequently tested positive. Both are okay, though my mother is feeling a lot of fatigue, and will be isolating until the end of the month. After some brutal cold, we got some warmer weather and we managed to get a couple trips to the ski hill in, as well as a couple of bike rides thru the trails.
Dakota
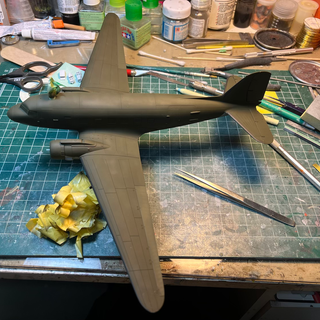
Paint has been completed on the Dakota. The fabric control surfaces tended to fade faster than the other paint, and this was represented using a version of the base olive drab lightened with a few drops of deck tan. Some of this mixture was also used to moderate the colour over the top of the fuselage, and at the wing roots. I still need to repaint the zinc chrome colour in the main gear wheel wells.
Photo 1 - Olive drab intentionally applied in an uneven cost
Photo 2 - Masked up to paint the fabric control surfaces and deicing boots.
Photo 3 - Tape removed to show the black deicing boots and the lightened colour on the control surfaces.
Photo 4 - A close up to show the colour moderation along the top of the fuselage.
Photo 5 - The undersides.


My desired paint scheme is for a 427 Squadron Dakota, based in Europe, in 1945. From what I have read, 435, 436 and 437 Squadron Dakotas were the first aircraft to bear “Royal Canadian Air Force” markings, fully spelled out. That is just too tempting a marking and I set about figuring out how to create the scheme.
Just before Christmas, I had bought a set of decals from CanMilAir, printed by Above and Below graphics. It wasn’t until I looked more closely that I realized that they were actually a 435 Squadron Dakota. Many of the markings are similar, including the all important Royal Canadian Air Force lettering. But the rounders, squadron codes and nose codes were much different. Time to see if I could paint the markings.
I wanted to create this specific plant, and found a good article from IPMS Canada about the 437 Dakota, and Z2-M in particular. IMPS Canada also did a decal sheet but they are long gone and the best I could find was a photo of the decal sheet. That, and a similar build done on Britmodeller https://www.britmodeller.com/forums/index.php?/topic/235098803-no-437-squadron-rcaf-dakota-a-continuation-of-the-kwitcherbitchin-story-final-pics-posted/ was enough to create a set of masks.
The first step was to try and create the RCAF wording. Some bad math forced some trial and error, and on the third try, I had a set of masks that fit. The results far exceeded my hopes.


The other critical marking was the triangular OD squadron code on each side of the nose. It occurred to me that it would have been easier to have painted the white as the very first colour, the apply the “white“ masks, spray the black, apply the “black“ masks, and then apply the aircraft colors. After a lot of thought, I decided it best to apply the masks and spray the white, cover and spray the black, and then see how it worked. I was again very pleased with the results.
Photo 1 - Mask on and ready to spray the white
Photo 2 - White applied
Photo 3 - White areas covered, black areas not yet removed.
Photo 4 - Black applied
Photo 5 - Masks removed and looks wonderful!


With the two hardest parts out of the way, it was time to apply the rounders, codes and fin flash. The door hinges on the port side caused some challenges and needed a little touch up. Other than a bone headed move that left a blue fingerprint along the starboard letter Z and M, it went really well.


CL-52
White had been sprayed for the rudder, and as an undercoat for the fluorescent orange. Frustratingly, it soon became apparent that a ghost seam had appeared on the top of the fuselage, just behind the wing. The joint was reglued and out came the Mr. Surfaced to fill the seam. The white was resprayed, this time with Alclad white primer rather than the previously used Model Master Insignia White. I didn't like the way the enamel Model Master white was covering. I have had good experience using the Alclad white primer, and was happier with the results. Time to spray the fluorescent orange, and then the dark metallics on the engines. It should be easier to mask these before rather than after spraying the overall silver.
Photo 1 - The ghost seam has been reglued and the filled with Mr. Surfacer
Photo 2 - The white was resprayed.


Next up was the orange. Three coats were needed to slowly build up the desired colour density. The masking of the orange fuselage stripes was a pain, and needed to be adjusted slightly from published dimensions to better match the model. The rear of the engines are a darker metallic, and have been sprayed but not masked. Almost time for the main aluminum finish.


That’s it for now. Take care and stay safe.


Comments