September 19 2021
- paddleriver
- Sep 19, 2021
- 4 min read
We have reached that time of year when it is dark when I get up, and the sun hasn’t risen as I pull into work. A depressing sign of fall.
Northstar
The Northstar has been primed, sanded with increasing fine sandpaper, and then polished to within an inch of its life. A couple of touch ups and further sanding were needed to get the finish ready for the natural metal spray.
I used Tamiya Fine White Primer as my white top coat, thinned about 50/50 with Tamiya‘s lacquer thinner. Two coats where used, with the first coat sanded lightly before applying the second. After drying for several days, the white was sanded with progressively finer grit sandpaper, then polished with Tamiya coarse polish.
The Vintage Models decals include pre cut vinyl masks for the cheat lines. Studying the decals carefully suggest that they need the white paint underneath to display properly. It took a lot of study of the painting instructions, and several repositioning attempts, to get the masks lined up and straight. The vinyl is slightly stretchy, and it was necessary to cut the vinyl and overlap in the middle or it would have been too long.
The Vintage decal sheet also included decals for the deicer boots. Rather than use these decals directly, I scanned them and created and cut vinyl masks. I felt this would be easier to position, especially if the deicer decals were too long or too wide. As it turned out, all the decier decals were too long, and the wing sections were too wide. My home made vinyl masks took a little trimming but were soon in place. With the deicers masked, the white top could also be masked.
Photo 1 - the primer has been sanded and polished. It is soooo smooth is is shiny!
Photo 2 - the white has been sprayed and sanded smooth
Photo 3 - the vinyl cheat line masks have been applied
Photo 4 - The deicer and top surfaces have been masked.


It was time for the natural metal finish. On the CL-44, I had initially used Alclad Airframe Aluminum, but found it too shiny. That was exactly the effect I wanted for the underside of the Northstar fuselage, and for the front panels of the engines. The Airframe Aluminum required a gloss black undercoat in order to create the high shine. Tamiya gloss black, when used on the CL-44, caused the metal finish to crack. To avoid that happening again, I used Alclad gloss black undercoat. After sanding and polishing, it was so shiny it reflected like a mirror.
The Alclad Airframe Aluminum was sprayed in several light layers, building up to the final effect slowly. This is necessary, as a heavy, wet coat will not result in a uniform finish.
Pictures of Northstars show the fuselage underside and the engine cowlings to be shiny. I couldn't find a picture of the top of the wings, and only one picture of the underside. The underside looked rather uniform and consistent, but perhaps not quite as shiny as the fuselage. I used some artistic license and decided to paint the middle panels of the wings, and the front panels on the rear stabilizers, using the shinier aluminum. The front portion of the wing will be painted in a different colour - perhaps Alclad white aluminum or duralumin, while the control surfaces and flaps will be painted in Tamiya AS-12 silver. I will let the first aluminum layer cure for a couple more days before starting to mask.
Photo 1 - the gloss black, polished and shiny
Photo 2 - Airframe Aluminum applied to the underside of the fuselage, front of the engine cowling, front of the stabilizers, and the wing centre panels.
Photo 3 - Airframe Aluminum applied to the top of the wing centre and the front of the stabilizers.


Hawker Typhoon
The Aires resin cockpit is very nice. Well cast, with fine details, and lots of small parts. Test fitting shows it fits into the kit well too. Its unfortunate that the instructions are so poor. They don’t provide enough information on where all the little parts go, and there are no colour call outs whatsoever.
There is only one surviving Typhoon, a Mk.I bubble top. What few cockpit pictures I could find appear to be for the surviving example, as I couldn't find anything for the car door version. References are mixed as to whether the cockpit is interior green or black/silver. There was some suggestion that the black/silver was prevalent for the later versions. Based on that, I decided to go with the interior green.
The major cockpit sections were sprayed with Tamiya acrylics - interior green, silver and black - depending on the component. The cockpit consists of 4 walls, that then fit inside the kit’s fuselage sections. Test fitting of the 4 cockpit walls found issues with fit of the front and back walls. The sidewalls had angled ends while the end pieces seemed to fit best in the vertical. After taping everything together, and then fitting into the fuselage, it was decided to bend the back wall forward slightly, while the front wall was sanded until it fit snugly against the sidewalls.
I am not convinced the resin cockpit added that much. The kit cockpit was decent, given that the fuselage opening is so tiny. Very little detail, other than the seat, will be visible once the fuselage is joined up. With that in mind, a number of the resin and photoetched details were left off. They were simply too small to matter, or would never be seen once installed. Even so, it likely took more than 10 hours to paint, assemble and fit the cockpit. The final result looks good but I don’t know I would go thru that much effort again.
Photo 1 - The major resin pieces have been cut out and taped together to test fit
Photos 2 & 3 - Cockpit assembly in progress - with and without flash
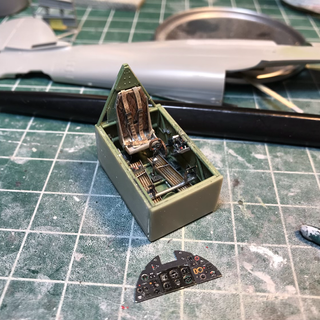
Photo 4 - Cockpit assembled with the instrument panel propped up for display.


Comments