September 2026
The month started with a road trip to Kelowna, heading west with a fully loaded Suburban. Christine moved into her new apartment on September 1, needing half a day to get everything unloaded, up to her apartment, and into some sort of order. The rest of the day was spent assembling Ikea furniture we had hauled from Calgary. The next day was much quieter, starting with a search for replacements for parts missing from the Ikea boxes. This was followed by trips to Walmart and Homesense to find cleaning supplies and other essentials. Her new apartment is about the same size as my first place, but is much nicer, brighter and whiter. It also has a tremendous view of Okanagan Lake, the Eldorado Hotel and Marina, and the rest of the city.
Marie headed to McMurray on September 17 for a friend's birthday party. She swung by our old house and took some pictures. The flower beds are full of weeds, but the lawn is mowed, and the neighbours say that the new owners are about to redo the roof and siding, and replace the windows. Good to know that they are taking care of the place.
Christine made a quick trip to Calgary the weekend of September 27. The primary reason was to have her implant checked. The great news is that the implant post has healed perfectly, and is ready for a replacement tooth. Now, all the remaining work can be done in Kelowna. While here, she took the opportunity to clean up some of the things she had left behind. It was a short trip but it was great to see her and hear about her new job.
We ended the month by buying a new car. More correctly, we ordered a new car, with expected delivery in 4(ish) months. It is a 2027 Volvo EX60, a fully electric quasi SUV/station wagon. We will trade in the existing Volvo will be traded in once the new one gets here.
Special Hobby Cornell
It isn't unusual, at least for me, for a build to get to the point that you simply want it finished, and the Cornell is there. It seems like I have fought with it every step of the way.
Pink primer was used as a prep for the yellow (Photo 1 below). Yellow paint is notorious for poor coverage, and the pink helps get better coverage using fewer layers of paint. The first coat of primer did it's job and highlighted a number of areas that needed attention. In particular, the front windshield and rear canopy, and way too many panel lines.
My scribing skills are not very good. In particular, I have a lot of trouble lining up a new line to match an existing line. In hindsight, I should have simply filled all the existing panel lines, including the control surfaces, and started completely fresh. Eventually, after several rounds of filling, sanding and rescribing, something reasonably acceptable was achieved.
It was necessary to paint the plane overall yellow before attaching the canopy (Photo 2 below). The turtle deck - the fuselage area under the rear of the canopy - was yellow and needed to be painted before the canopy could be installed. Masking tape was used to cover the open cockpit and the plane was sprayed Model Master RAF Trainer Yellow.
It was now time to attached the canopy. The vac form canopy had an unusual attachment at the front - essentially a butt joint against the fuselage. It soon became apparent that the front of the canopy was slightly high compared to the fuselage, but I didn't want to risk sanding things down any more. A lot of filler and sanding was needed to finally blend the front of the canopy into the fuselage. The rear of the canopy simply rested onto the fuselage. Even with careful sanding, there was a gap at the back that needed to be filled. Mr Surfacer was used to close the gap and blend in the joint, with a lot of very careful sanding to clean up the joint (Photo 3 below).
The canopy was masked, and pink primer was resprayed. The rear canopy joint was okay but the front canopy joint needed more work. The port side was okay but the starboard side still had a noticeable step that needed more filler and sanding. Two more rounds of fill, sand, prime were needed (Photo 5 below).
The canopy had frames moulded in but they proved very hard to see. It wasn't possible to tell whether the frames had rounded corners. After consulting pictures of real planes, it was decided that the frame intersections were indeed rounded. Small circles of masking tape were punched out to mask each corner (Photo 4), then filled in with small pieces of tape (Photo 6).
Photo 1 - Pink primer applied
Photo 2 - First coat of yellow applied and polished
Photo 3 - Blending the vac form canopy into the rear of the fuselage
Photo 4 - Masking the canopy was a very slow process
Photo 5 - Ready for paint
Photo 6 - Black anti glare nose painted
The kit included decals for the wing walkways but nothing for the nose anti glare panel. The aftermarket decals also didn't provide them. Out came the tape to mask the nose panel and spray the black. Removing the masking tape pulled up little bits of black, leaving a jagged edge. It took three more rounds of masking and painting to get an acceptable anti glare panel edge (Photo 1 below)
The paint was given a quick sanding with a 4000 grit sanding sponge to remove any dust nibs and to polish the paint. The aftermarket decals were from a unfamiliar company, but weren't complicated. Per normal practice, the decals were cut out, soaked in warm water, and left until they released from the backing paper. Except they wouldn't release. A second, longer dip into the warm water was tried, and the decals were left to release. Again, they still refused to release from the backing. The decal instructions were belatedly consulted, and didn't say anything helpful, but a warning was now noticed that the decals were printed on a continuous decal sheet. This means that the decals are actually one continuous sheet. It is up to the modeller to closely trim each marking to reduce the amount of clear decal film around the marking. I had done no such thing, assuming each marking was printed separately. In panic, the decals were picked up and an effort was made to trim away the large areas of clear film. Naturally, this is when each marking finally chose to release. The saving grace was that only four decals had been dipped into the water. Three of the four were successfully trimmed, but the four ended up tearing and was rendered unusable. Fortunately, the damaged decal was a serial number and a replacement could be scavenged from another part of the decal sheet.
Once aftermarket decals applied, it was realised that they were printed slightly out of register. It was most noticeable on the roundels, were a sliver of white was visible outside the blue edge. There really isn't much that can be done to correct it, short of removing and replacing the decal, as any effort to touch it up with paint would stand out like a sore thumb. It was decided to leave the decals and move on.
The propellor proved to be very strangely shaped. An attempt was made to sand it into a better shape but the end result still looks "off". The hub is too thick and the blades come off the hub at a strange angle. It was left as I didn't have a replacement in the spares box. The prop was painted in buff, then raw sienna oil paint was applied to create a pretty convincing wood effect. The kit includes a photo etch prop hub that was carefully installed using CA.
Removing the canopy masking tape started well until I realised that the yellow paint was sticking to the masking, leaving a jagged edge . An attempt was made to score around each mask with a knife but I am not sure it made much of a difference. The damaged areas were remasked and then carefully brush painted. The result looks okay from a metre away but is visible from close up.
As the masking was being removed, one of the main landing gear wheels popped off and headed for parts unknown, while the other gear leg broke and fell onto the desk. The missing wheel was eventually found after 20 minutes, and both wheels were reglued. Setting the plane down to take a picture, I noticed the PE prop hub was stuck to my finger. It was carefully removed, a drop of CA applied to the prop, and the hub placed back in place using tweezers. The hub was missing again when the plane was positioned for final pictures. A search was completed, looking high and low, but the little PE hub was nowhere to be found. It was very tempting to test the plane's aerodynamics but cooler heads prevailed. A poor replacement was made from a piece of tape, punched to the correct size, and painted silver.
And with that, the plane was considered finished.
Photo 1 - Repainted four times until finally happy worth the nose anti glare panel.
Photo 2 - Decals complete
Photo 3 - Landing gear and prop painted and installed
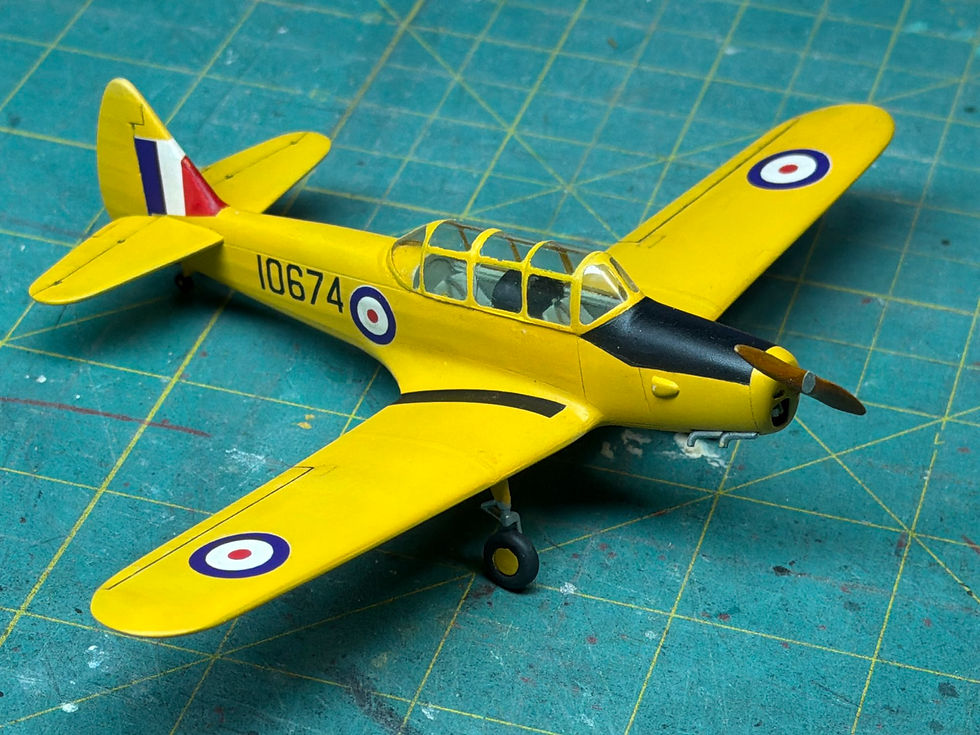
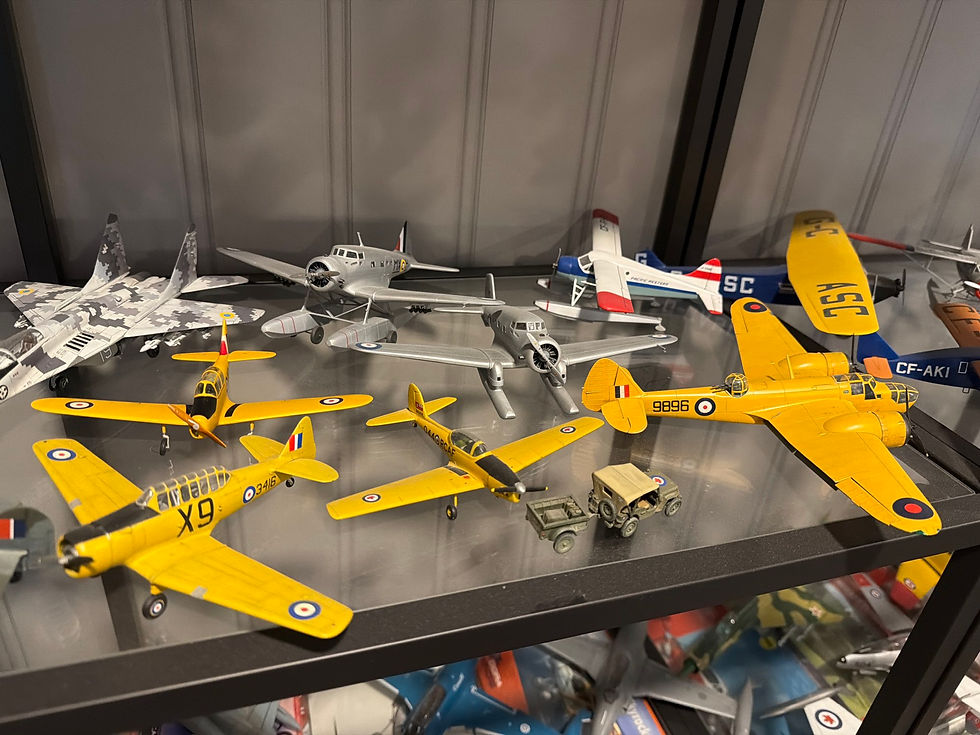
This was a simple kit that should have been an easy build. Poor fit and lots of errors made it more challenging than expected. It looks good enough on the shelf with some of the other BCATP planes. I am happy to have a Cornell in my finished collection but I won't rush to build another one.
Here are the finished pictures.
Pavla Oxford
Another kit that is starting to outlive it’s welcome.
I have had a terrible time getting the vac form canopy and glass nose to fit. Each piece has been sanded, fit, pushed, prodded and sanded again in an effort to improve fit but it doesn’t seem to be getting better. Finally biting the bullet, the canopy was glued in place with Testor’s canopy glue with the hope that putty can be used to blend it in.
A strip of masking tape was applied over the rear of the canopy and Mr Surfacer brushed on to see what needed attention (Photo 1 below). Wet sanding, using a fine grade sanding stick, began to refine and shape the filler. Unfortunately, the water reactivated the canopy glue and the canopy separated. Two more tries were made, each ending in the same result. Time to try another approach.
The glass nose had a large gap at the rear edge, and was smaller than the fuselage plastic at the front. A brilliant solution popped into my head one night as I was falling asleep - clear UV resin. Magically, a Calgary company makes clear UV resin kits, complete with the UV light, for a fairly reasonable price, and a kit was quickly ordered. The instructions were rather vague, so a little experimentation was necessary. With considerable nervousness, the resin was then applied to the plane’s nose. Strangely, the cured resin peels off when filed, but sanded well. A relatively coarse sanding stick was necessary to make any reasonable progress. It proved difficult to feather the edges smoothly, as the resin appears harder than the plastic. Three rounds of resin, curing and sanding were necessary to build up the glass and close the gaps, but a reasonable joint began to emerge (Photo 2 below). Increasingly fine grades of sandpaper was used to polish the glass/resin to restore clarity (Photo 3 below). A final application of Tamiya polishing compounds produced an acceptable result (Photo 4 below).
With the glass nose in place, it was time to go back to the canopy. It was reglued with the canopy glue, and then the UV resin was applied to the rear surface. Unlike the nose, the resin wouldn’t sand smoothly, tending to peel off. A second attempt was made with the UV resin with the same result. Once again, as the wet sanding was beginning to loosen the canopy glue, the canopy was removed.
The UV resin seemed to fail at a section where the canopy was slightly higher than the fuselage. A final effort to improve fit was attempted. Removal of almost all of the lower starboard canopy rail was needed, but a smoother overall fit was achieved.
Somewhere in all the fiddling, one of the control columns went missing. A search of the bench and surround floor didn't turn up the missing part, and I was getting too frustrated to make a replacement. The canopy was reattached, this time using Tamiya Extra Thin to try and get a stronger bond. The rear of the canopy was masked, and Mr Surfacer brushed on to test fit. Two more Surfacer applications were needed but a smooth edge was finally obtained (Photo 5 below).
Attention turned to the lower sections of the canopy. White glue was used to fill the gaps at the front on both sides. Tamiya Putty was applied along both sides and sanded smooth. With things looking better, Mr Surfacer was applied to test for gaps and sanding smooth. (Photo 6 below). A couple applications were necessary but the canopy was finally on and blended in (Photo 7 below)!
The canopy was slowly masked using bits of tape, cut to shape. It's a slow process that took about 2 hours to complete.
Photo 1 - Hope this works
Photo 2 - The before picture
Photo 3 - Multiple layers of resin applied and rough sanded to shape
Photo 4 - Finish sanding complete and polished
Photo 5 - Rear of canopy blended
Photo 6 - Blending in the port side
Photo 7 - Doesn't look pretty but ready for masking and primer
Photo 8 - Clear parts masked
Photo 9 - Primer always finds areas that need further attention
The painting that is being used as a reference shows the canopy frame as black. Tamiya semi-gloss black was sprayed over the masked areas and around the canopy's outside frame. This was masked and the entire plane was primed. As usual, the primer found a number of areas that needed repair. The biggest issue was that all the handling had popped the top fuselage seam in two places, requiring it to be reglued, sanded and then filled and sanded again.
KP Cessna Crane
With the Cornell complete, work started on the Crane. Kovozavody Prostejov (KP) is a relatively new Czech company, known for making models of lesser known and unusual airplanes. There kits have a mixed reputation, due to varying levels of quality. At first glance, the Crane kit appears to be well moulded, with nice details, relatively fine panel lines, and little flash. The parts are few and fairly simple.
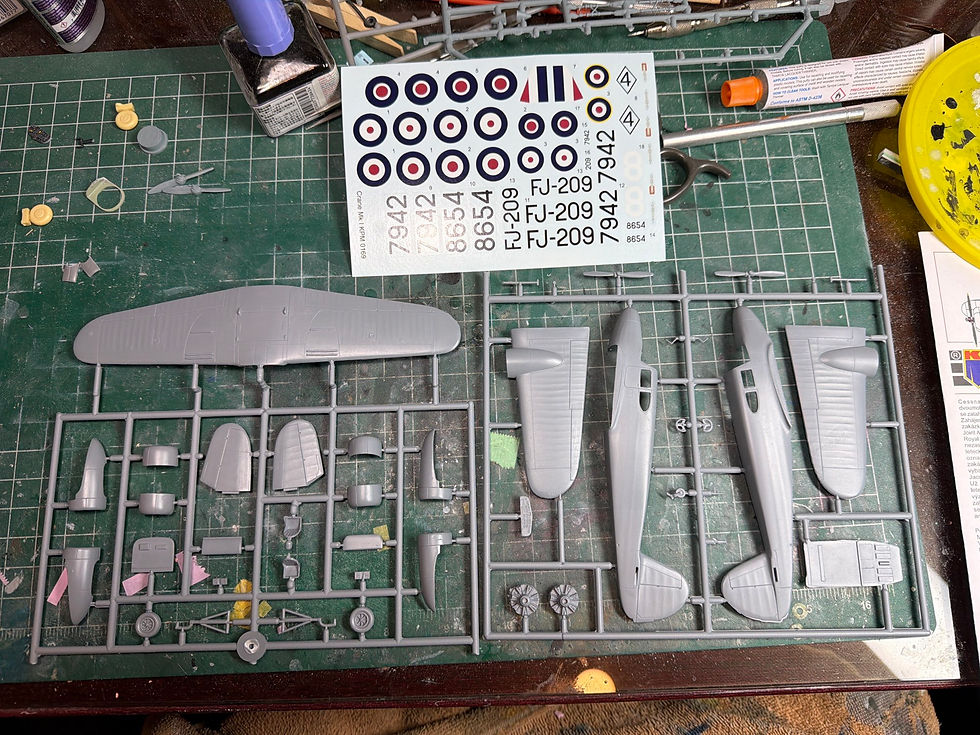
The instructions suggest starting construction with the main landing gear, installing it into the wing and then mounting the engine nacelles around it. This seems like a recipe for broken landing gear, at least for a klutz like me, so other options need to be found.
Instead, work started with the cockpit. It soon became apparent that my initial thoughts about flash were wrong. Pretty much every part needs some kind of clean up. What also becomes apparent is that the ejector pins are huge - easily large enough to interfere with parts fit.
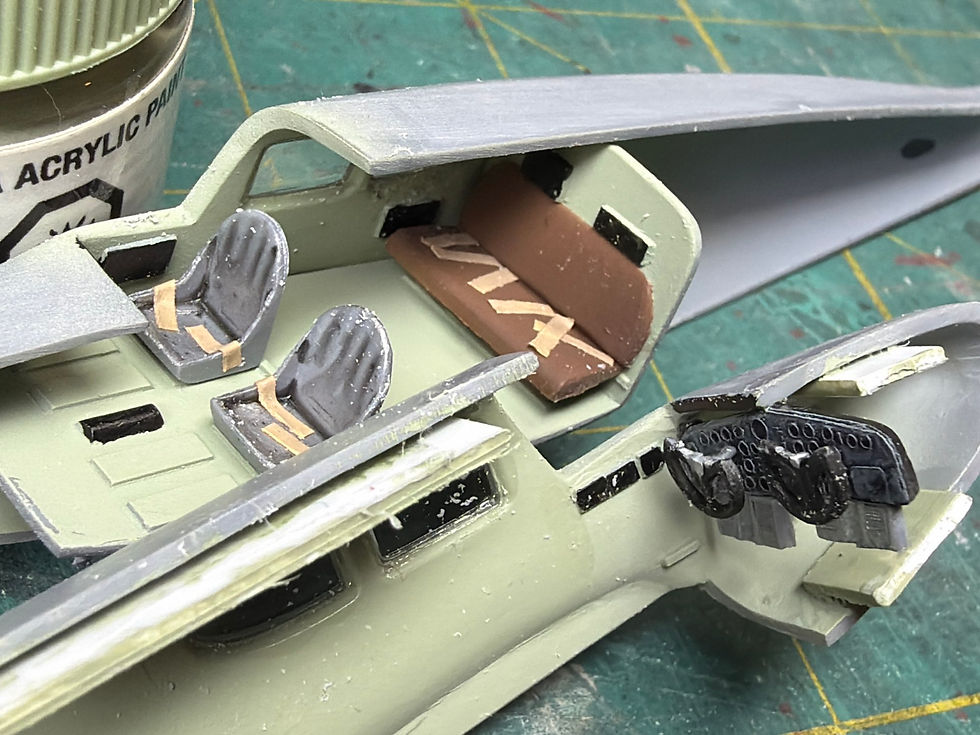
Cockpit details are simple. There are some square shapes modelled on the inside of the fuselage sides - perhaps equipment boxes? - to be painted black. Otherwise, there are only seats, a nicely detailed instrument panel but no instrument decal, slabs of plastic for rudder pedals, and a rear bench seat. The instructions make no mention of control columns but the sprues contain two very oversized control wheels. Photos suggest these are intended to be mounted directly to the instrument panel.
Simple seat belts were made using painted masking tape. I couldn't find any info to confirm the rear seat had belts, but figured it must. The picture below makes the tape look grossly oversized but not much will be seen through the windshield. After installing the tape belts, it was realized that the decal sheet provides decal belts for the front seats. This isn't called out in the instructions so was missed.
That's it for another month. The leaves are starting to change colour so the annual battle to rake them all up will probably begin next week. The weather is noticeably cooler at night but the days are still pleasant.
Stay safe everyone. Until next month.


Comments