End of February 2023
- paddleriver
- Feb 26, 2023
- 6 min read
It has been brutally cold for the last week, and Marie and I basically just hunkered down, unwilling to go outside. We had a power failure about 8:30 one morning, when it was -32. Gas fireplaces were lit so we kept heat in the house for the 40 minutes or see before the power came back on.
Marie is at a quilting bee on Saturday, so I was watching Ember. She is up to 7.5 lb now. Over the last week, we have come close, a couple times, to a no pee in the house day. Ember will now let you know she wants out but you have to be paying attention. Sometimes she dances. Sometimes she whines at the door. Sometimes she sits right in front of you and looks you in the eye. Hopefully we have gotten past the pee in front of you if you aren't watching.
Christine was on the way home Saturday for her reading week, and her airline challenges continued. Her flight connected thru Calgary, and she was supposed to have 2.5 hours to connect. The plane out of Ottawa was running late, and her connection time was down to 10 minutes. Salvation appeared about an hour into her flight when the Calgary to McMurray connection suddenly showed as being an hour and a half late. It was a long enough delay for her to make the connection, but not long enough for her luggage. It is supposed to arrive late Sunday afternoon.
Nicholas was off the past week as it was Carleton's reading week. He took advantage of it to enjoy Ottawa's winter carnival and to catch up on his sleep/studies. But no skating on the canal this year, as it won't open for the first time in 58 years. Syncrude called him mid week to ask him to complete a medical check. Unlike AER, who he worked for last year, they won't allow him to complete the medical work in Ontario. Instead, they are paying for him to fly to Calgary, including a rental car and hotel overnight, and then fly back the next day. He will make the trip in mid March so it doesn't impact his finals. That's a lot of money and effort to pee in a cup!
Daniel was also on reading week. He went ice fishing on Sylvan Lake on Monday! Back to Edmonton, he got to use some really cool tools, like a plasma cutter, as the F1 team started construction of their car. The last pictures shows a 4x8 ft sheet of aluminum plate, cut on the floor with the plasma cutter, for the car's frame.


Lancaster
Construction is down to adding all the "sticky out bits."
FIrst up was the landing gear. Recall that they were supposed to have been installed thru the top of the wing, but I confirmed (after the fact) that the main gear leg could be inserted from underneath. It proved to be extremely tight fits, with considerable worry that the force needed would break something. THankfully they were inserted succesfully, and the connecting gear pieces and wheels added.
Photo 1 - Landing gear was fiddly to install - all my faculty
Photo 2 - On her wheels for the first time


Next were the turrets, consisting of the nose, upper and tail turrets. The Eduard mask set had masks for the nose and tail turrents. The upper turrent was substituted from a Halifax, to better represent a Canadian built Lancaster Mk.X, so it had to be masked by hand. An hour later, placing little bits of tape, and the upper turrent was masked. The nose and tail turrets were faster, but still took an hour for both. Five minutes painting and they were done.
I was searching the web for pictures of the upper wings, to get an idea of how to model th Lancaster's prominent exhaust stains, when I came across a picture that showed the upper turrent as a single piece without any framing. Further searches confirmed that the Mk.X upper turret was a single piece of perspex, with no framing. So all that masking was for nought. Instead, the cast on framing was sanding off, then the turret clarity was restored using finer and finer sandpaper.
Lancasters had very prominent exhaust stains. Typically black, but they could include very visible tan or white stains. This Lancaster had 35 missions, so it would have had plenty of time to create prominent staining. The stains were modelled by spraying a dilute black layer first, then a grey layer slightly inside the black, and finally a tan layer in the center.
Photo 1 - An hour of masking
Photo 2 - Two hours in total for less than 5 minutes spraying
Photo 3 - Looks nice. And it's completely wrong
Photo 4 - Framing sanded off. Now to restore clarity.
Photo 5 - Polished and mounted


Turret installation was delayed for installation of the bomb bay doors. allowing the plane to be placed on its back without damaging anything fragile. Test fitting showed the doors didn't fit well, needing to be more curved. Some gentle pressure was used to create the necessary bend and they doors were installed using CA. While the plane was upside down, the towel rack antenna and the pitot tube were also installed.
WIth the plane right side up, the turrets were installed. The canopy and bombardier's nose glass were also unmasked. I have had problems with paint flaking as the canopy is unmasked, so tried running a knife blade around the masks to break the paint seal. That proved more problematic, flaking off more paint than simply peeling the masks off. Some very careful touch up by hand was needed to restore the chipped paint.
Last thing to do was add the props and spinners. The real plane had the spinners painted with roundle blue before returning to Canada, adding a little colour to the model.
And with that it was done! I will need to get some completion photos once we get a sunny day.


Anson
Painting and various clear coats on the Lancaster gave time to progress the Anson.
With the top turtle deck and lower fuselage inserts in place and carefully sanded, it was time to add the wings. The wing consisted of a single, full length bottom and two top halves. The bottom fit well, only needing a smear of Mr Surface along some of the seams. Lots of clamps were needed, and the joint was allowed to sit over night to be sure it was fully cured.
The top wing fit well along the fuselage, but the top wing to bottom wing joint had an offset that couldn't be corrected. Lots of clamps were again needed to hold the parts in place while the glue dried. Once dried, the leading and trailing edges were sanded down to remove the offset. Airfix used an unusual top joint along the back of the wing, which required filler and sanding to clean up.
Photo 1 - Bottom wing on
Photo 2 - Upper wings on. Needed to use a few clamps to get a good bond.
Photo 3 - Minor joint repairs in progress


Next Builds
With the Lancaster complete, it is time to bring another kit onto the bench. I had been thinking it would be a double build of two Cold War warriors, a CF-5D and a CF-104. This was disrupted by a much appreciated Christmas present, from my friend Dave, of another Cold War jet, a Mig-21. Throwing caution to the wind, I pulled out an English Electric Lighting to round out the Cold War fleet.


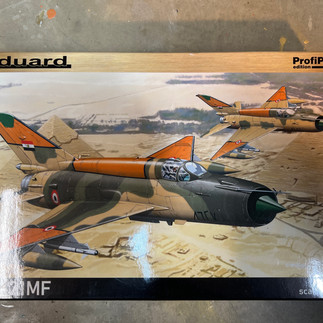


The Mig-21 is the superb Eduard Profipack kit, including resin and photoetch details sets, as well as canopy masks and an extensive decal sheet. I like the colourful Egyptian box top art, but will likely go with either a Polish or Czech jet to stay with the Cold War theme. This wil be the first one up.
I have always considered the CF-5D Freedom Fighter to be one of the most beautiful jets ever built. There is something about its graceful proportions that really attracts. The Kinetic kit represents the model well but is not an easy build. I really like the aggressor "Lizard Scheme " shown on the box art, but to me, the quintessential Canadian CF-5D is silver. A silver Cold Lake jet would be ideal. I have a couple more of these kits so the aggressor schemes will eventually get done.
The CF-104 Starfighter is the recently issued Kinetic Gold kit. Kinetic has really improved their kits since the CF-5 was issued, and this kit is supposed to be really nice. Somewhere I have a resin ejection seat, and a Quinta Studios 3D cockpit decal. The natural metal jet shown on the cover, based at Cold Lake, will be my choice. I have a number of other Starfighter kits, including Hasegawa, Eduard and two more Kinetic, so the European green and camouflage jets will eventually get modelled.
Last is the Airfix Lightning. This kit is now over 10 years old but is considered the first kit from the 'new' Airfix, and remains highly regarded. I am not sure why I am fascinated by the Lightning. Perhaps it is because, like the Starfighter, it is one of those jets that looks fast standing still. Kit markings include blue tailed and a red tailed natural metal jets that are both attractive.
And that's it for another week. The weather next week is looking much nicer, so perhaps I will take advantage of Christine being home to watch Ember and get in some bike rides, mixed with baseboard painting . Stay safe everyone.


Comments