Halloween 2021
- paddleriver
- Oct 31, 2021
- 4 min read
It is Halloween! I can remember some absolutely brutal cold Halloweens. Today is a relatively nice day. Sunny, just above freezing, with no wind. It will be interesting to see how trick or treating is affected by covid.
Northstar
Decals are complete and all the small bits are painted and ready to install. Just need a gloss coat or two to protect the decals before installing the last pieces.
Photo 3 shows an experiment. One of the props with painted deicers. The prop was painted black, then separate 0.4mmx20mm masks were cut and ever so delicately placed on the blades. I wasn’t certain that I could cut such thin masks, or that they would actually work, but it worked out well.


Hawker Typhoon
Lots of work on the Typhoon this week. It has progressed from unpainted thru to fully painted. All the markings were masked and painted, including the underwing identification stripes, roundels and squadron codes. The decided to paint the markings first, with masks created and cut for each marking. Once the markings were complete, masks for the grey camouflage were created and the main colours painted.
Underwing ID markings
Typhoons apparently looked like a Fw-190 from below, resulting in a number of losses from friendly fire. To reduce the problem, Typhoons received black and white ID stripes on the underside of the wing. The photos how these were painted.
Photo 1 - primer applied and smoothed with 3200 grit sanding pads
Photo 2 - The landing gear doors inserted and held in place with poster tack before the white area was painted.
Photo 3 - Masks cut to cover the areas to remain white. 2‘ wide white and 1’ wide black. 6mm Tamiya tape is conveniently 1’ wide in 1/48, and was used to ensure the vinyl masks were spaced evenly.
Photo 4 - ID stripes complete. The outer black stripes will be masked to create the 1’ wide stripes.


Roundels and squadron codes
Masks were created for the roundels and code letters by scanning the decals and tracing them in the cutter software. This isn’t that difficult and goes fairly quickly. I was nervous about using a “traditional” cut out mask for the code letters. I was worried that the wing would interfere with the mask sot that the mask wouldn’t sit properly. I decided it would be easier to paint the squadron codes before the main camouflage colours were applied. This meant painting the sky colour first and then applying a letter mask as shown in the photos below. The roundels were also painted and masked before the main colour was applied.
Photo 1 - The roundel markings are applied and the white applied to the lower wing and fuselage locations.
Photo 2 - The white masks are reapplied and the masks for the red areas are removed. The observant may have noted that the outer starboard cannon is missing. Somehow it was bumped and ended up inside the wing. Argh!
Photo 3 - The red areas are sprayed
Photo 4 - The red masks are reapplied and the blue areas are removed and sprayed. Cannon retrieved from inside the wing and strongly glued back in place.
Photo 5 - The yellow area on the fuselage has been removed, yellow sprayed on the fuselage roundel and the leading edge of the wing, and the yellow roundel mask reinstalled.
Ignore photos 6,7 & 8. They have been deleted but don’t go away. Ignore the comment if these photos don’t show in the published blog.


Camouflage
I would normally use a combination of blue tack worms and masking tape to create the two tone main camouflage. Another experiment was tried vinyl masks were created and cut . Creating camouflage masks was a little more complex than for the roundels for a couple reasons. The first is that the masks need to be 3D, while the painting instructions are obviously 2D. And unlike the decals, the painting instructions aren’t to scale. Converting scales wasn’t hard, while going from 2D to 3D proved easier than I expected.
The process started with scanning the kit marking instructions and importing into the cutter software. A quick calculation allowed the instructions to be scaled up, and then the 2D instructions were traced to create masks. The traced outlines could be moved around in the software, allowing a plan view to be placed next to a side elevation view, and dimensions could then be tweaked as necessary. Once satisfied, the masks were sent to the cutter. The process took about an hour, or about the same time to create masks the more traditional way.
Photo 1 - The colour demarcations are sketched out using pencil
Photo 2 - The bottom colour, Medium Sea Grey, has been applied. It is hard to see in the picture but it has been intentionally mottled.
Photo 3 - The first of the top colours, Ocean Grey, has been applied. It has also been intentionally mottled
Photo 4 - The masks have been applied over the Ocean Grey.
Photo 5 - The Dark Green has been applied. It shows much darker in the photo than in person.


So, how did it turn out? Mostly good. The camouflage markings worked really well, and only need a couple of minor touch ups. The squadron codes worked perfectly, and I am very happy with the results. I will definitely do this again. The roundels were a mixed bag. I was most worried about the narrow yellow bands on the fuselage roundels, which came out fine. But I have several spots where the replaced mask wasn’t properly lined up, and the wrong colour became visible. Most examples are where a white band is visible when it shouldn’t be. Some careful masking and touch up should take care of it.
Photo 1 - a pile of spent masking
Photo 2 - the underside
Photo 3 - the top side
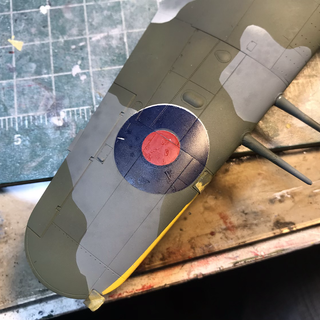
Photo 4 - detail of the fuselage roundel and code letters. The white and red areas may need a little tweaking.
Photo 5 - a wing roundel showing the white outline from a poorly replaced mask.


That’s it for this week. Take care and welcome to November!


Comments