January 2026
- paddleriver
- Jan 25
- 5 min read
Happy New Year! I hope everyone had a great holiday.
It was wonderful to have all the kids home for Christmas. The weather was wonderful and we had a great time. Activities included visiting both grandmas, seeing Zoolights, and brunch in the dome at the Banff Springs. The kids got out skating on the local pond a couple times, and made it into the mountains to ski and skate.
I had my hernia follow up with the surgeon on January 7. Everything has gone well and I am cleared back to normal activities. I have no restrictions but told to use common sense. If it hurts, stop doing it. Makes sense.
Stitch was supposed to start physio on January 13, but the appointment was delayed to the 22nd. The surgeon confirmed back in December that the leg had healed properly, but he tends to walk a little funny. Physio is seen as a way to speed up muscle recovery, restore strength and help him walk “normally“. The physio appointment took a lot longer than I expected, with lots of observation, bending of the leg, and measurements. They confirmed that the leg is turned out slightly, and felt it was likely a result of him avoiding use of the leg while it was broken, and muscle memory locked it in. The leg muscles are also measurably weaker than the good leg. The expectation is that we can restore strength, and there is a good chance they can restore a normal walk, We were given a number of exercises to do at home, and he starts water treadmill on the 27th. I never thought I would have a dog in physio.
Railway
The trackwork at the right end of Oulton yard - I’m going to start calling this east - is completed. This finishes the planned trackwork in Oulton.
There are a number of options for next steps, including completing bench work, installing better lighting, or do the wiring. I am not a big fan of wiring but decided this needed to be the next step. It will allow trains to move through the existing trackwork, helping to find any problems or areas that need improvement. Hopefully this avoids carrying any trackwork mistakes into future sections.


Powering up the DCC system, and wiring the track, has been a steep learning curve. In theory, DCC wiring is easier than conventional DC. But there have now been two instances where I spent several hours, stumped, trying to figure out why something isn’t working. Yes, I have read the manuals. They aren’t especially useful outside the very basic functions. It almost seems like it was written for someone who understood everything already. Thank goodness for AI. It is actually pretty good at finding solutions, or providing references to other articles that are helpful. Slowly, but surely, the trackwork is being powered up and put into service.
I don’t think I have had a single turnout that hasn’t been reworked somehow. I ended up pulling up ties and/or cork on at least half of the them because of alignment issues. Others needed to be reguaged to bring track tolerances within requirements. Part of the reason for all the rework is the cast frogs being used. They are unforgiving of misalignment, with virtually no ability to make adjustments. And despite using templates and marking out track centerlines before laying ties, I find that ties exiting a turnout rarely match frog alignment. On the final two turnouts, I delayed laying the diverging track ties until the frogs were in place. It worked well for one turnout, but I ended up pulling ties on the second to make further adjustments. It’s proving to be a tremendous waste of ties.
I have been using suitcase connectors and tee-connectors for wiring connections. What a revelation!. They are so much easier, and so much quicker, than trying to strip and solder wires.
Photo 1 - Wiring under a 5ft section at the east end of Oulton yard. $50 to anyone that can spot the error that caused a short.
Photo 2 - The same section from above.
Photo 3 - Wiring under the west end of Oulton yard


I am disappointed how many trackwork problems are discovered by running a locomotive along the track under it’s own power. I would have expected that pushing cars along the track by hand would have been equally effective. Somehow trackwork that was sufficient for pushed boxcars turns up problems when a locomotives powers through. This is particularly true of the turnouts. Boxcars roll through smoothly, but a locomotive bumps and sways through the same section. Problems are slowly being resolved, tested and reworked, until everything passes smoothly along. I will spend the next week or so running locomotives and different assortments of cars over the track. I have already found that using different locomotives and cars is important. Shorter and longer length cars and locomotives behave differently, finding problems where “standard” length equipment operated perfectly.

I am still trying to figure out next steps. It is tempting to start building structures and adding scenery to the existing section. But I think I will build the remaining bench work and finish laying track. Once bench work is in place, I can figure out lighting and upgrade the existing lighting. This should help laying the remaining track, and will make it easier to do scenery.
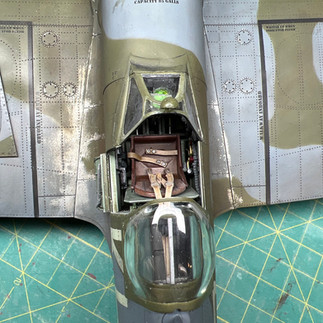
1/24 Airfix Spitfire
The Spitfire is finished!
I really enjoyed this build. It was a well engineered kit, with good fit and excellent detail. Enjoy the pictures.

The entire plane


The underside and landing gear


The engine.
The prop, spinner and all engine panels are not fixed in place. Top and bottom engine panels have decent press fits, and will stay in place without glue. The side panels are a more difficult fit, and need something to keep them in place. I have decided to put the top panel in place and leave the others off.


The wings and cockpit details.
The port side gun panels have been left off to see the details. The starboard wing panels are tacked in place to maintain the streamlined wing’s shape.
Removing the windscreen masking peeled the clear protective coating off. I tried to reapply it, but the difference is noticeable if you look closely.


The finished plane sitting on the display shelf.

1/48 Dream Factory A-4 Skyhawk
It has been several months since work was paused, so it took a while to figure out where I had left off. Unfortunately, the pause wasn’t gentle on the paintwork. The constant shuffling things around caused a number of noticeable scratches.
Photo 1 - Black nose areas repaired
Photo 2 - Off white underside areas repaired
Photo 3 - Lots of masking to repair the gray.
Photo 4 - Even more masking needed to repair the blue.
Photo 5 - Repairs complete. Now just touch ups needed.


That’s it for another update. Take care everyone. Stay warm and safe.


Comments