
May 2024
- paddleriver
- May 19, 2024
- 8 min read
Lots of things happened this past month.
The big news should be packing preparations, with the moving trucks now just over 4 weeks out. Packing continues, and I am at the point were I wish it was just all done with. There are boxes everywhere, and I have now had to reopen boxes three times to retrieve things that were still needed.
When I originally wrote this paragraph May 15, we a were under an evacuation alert due to an out of control wildfire 15 km south of town. On the afternoon of the 14th, the sky to the south looked positively apocalyptic. By 2 pm the afternoon of the 14th, the smoke was billowing directly over our house. The sky became dark and angry looking. Beacon Hill, Abasand, Greyling Terrace and Praire Creek were placed under a 2 hour evacuation notice, then upgraded to an evacuation, as the fire moved closer. Black smoke filling the sky, we were sure we would be next. Bags were packed and placed near the front door as a precaution. Important documents were gathered, a week’s supply of dog stuff was prepared, to join the pile at the door. Highway 63 south through the city became a virtual parking lot, jammed with cars from Taiganova to highway 69, as people decided they weren’t going to wait for an official evacuation. Just as it seemed it couldn’t get any worse, things started to get better. The wind changed direction, the temperature fell, and the smoke moved away. The afternoon news update made it clear the evacuations were to allow set up of protective fire equipment, such as sprinklers, and the fire chief was confident this was not a repeat of 2016. It was very smokey Wednesday morning but it was soon clear that the firefighters had the resources needed to successfully battle the wildfire. The cool weather continued Thursday and into Friday, giving the fire crews a chance. Friday afternoon, the long promised rain, in the forecast for the previous 5 days, finally started to fall. By Saturday afternoon, 20 mm of rain had fallen, and the firefighters were confident enough to lift the emergency alerts and evacuations. This afternoon, our rain gauge showed almost 50 mm of rain had fallen, with cool weather forecast for the next 5 days. I have never been so happy to have a Victoria day weekend rained out.
Nicholas came up for Mother’s Day. He spent much of the time here sorting and packing stuff to help prepare for the move. It was wonderful to see him and his help was much appreciated.
Daniel and Marie went to Austin at the start of May to get Daniel set up for his 8 month internship with Tesla. Over the course of 5 days he bought a car, furnished a bedroom, and got himself set up for work. With everything ready, they took a couple days to play tourist. And then Daniel waited. He was supposed to start with Tesla on May 6, but an error on their part delayed his start by 2 weeks. Daniel was not affected by the recent layoffs, but his HR person was, and his file wasn’t turned over to the replacement HR fast enough to prevent his security check from expiring. Faced with 2 weeks in a strange city, with nothing to do, he decided to take a few days vacation and headed to Hawaii. From all accounts, and the handful of pictures he sent, he had a great time.
Christine has finished first year in Architecture and came back home at the end of April, but we hardly see her. She is either working at the golf course or sleeping. She has been getting lots of extra shifts, between people calling in sick, and now people evacuating or choosing to leave the city. It’s good for her as she wants to make as much money as she can before heading back to school in the fall.
CPA Noorduyn Norseman
With the floats installed, if was a simple if fiddley matter to complete the rigging. Once the details were added, such as the exhaust and pitot, the model was finished. It looks pretty good from 3 feet, so it will have a spot on the shelves, but I am not totally happy with the result. The rubbery matt coat meant I couldn’t sand out any fuzz or blemishes, so the plane has a lot of fuzz and little bits of dust visible, detracting from the finished look.
The pictures below aren’t the best but I won’t wait another week for the sun to return. The model can sit on the shelf for a week before it gets packed up.


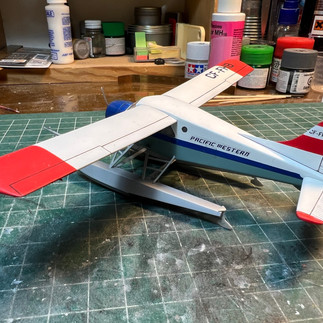
PWA DeHavilland Beaver
I couldn't locate any good written references as to how early PWA aircraft were painted. The decal instructions recommend the lower fuselage colour as light grey, but the few colour photos I can find seem to show it as a light blue or blue grey. Tamiya XF-23 Light Blue seemed about right, though it sprays very matt. The tail stripes and high visibility patches were painted with Model Master Guards Red.
The decals include wing registrations printed in red and blue. It took me a while to figure out the early PWA planes used the blue registration, while the later planes used the red letters. With that sorted out, the letters were masked and painted once the red patches were dry.
The blue fuselage stripe started out as a "positive" mask. The decal stripe was scanned and then traced to create a mask. This was applied to the fuselage, then carefully masked around. The stripe mask, now redundant, was removed and the blue stripe sprayed.
Making the blue fuselage strip expound a discrepancy between the instructions and the decal. Matching the drawing meant making the blue stripe wider than the decal. The masking was otherwise straightforward.
Photo 1 - Lower fuselage and high visibility areas painted
Photo 2 - Masking for the blue
Photo 3 - A bit of cleanup needed but that looks pretty good


Every build has at least one "oops" moment and here come the first for the Beaver. Somehow the registration letters, naturally the ones on the top of the wing, ended up with a scratch across three letters. I didn't think it would be possible to touch up the scratch, so I decided to try covering it with the decal. As the wet decal was slid on to the wing, I quickly discovered the decal was larger than the painted letters. This shouldn't have happened as the registration was painted using masks made by copying the decal. I carefully put the decal back on the backing sheet. Considering options, it was decided best to remove and then repaint the letters. I should have removed the lettering with alcohol, as they were done with Tamiya acrylic, and the wing was painted with enamel. The alcohol would have easily removed the letters without damaging the wing paint. Instead I tried to sand the letters off, resulting in a blue smudged mess. Making matters worse, both the white and red touchs needed three coats to cover the blue smudge. Two days later, the wing was repainted, and the kit decals safely in place.
The instructions make no mention of drilling holes in the fuselage for the float struts. Perhaps the holes had been flashed over but they weren’t visible. And it's much harder to do after the fuselage halves are joined together and painted.
The original intention was to mount the float struts to the floats, and the join the complete float assembly to the fuselage. A test fit quickly made it obvious that wouldn't work without three more hands. So I added the float struts to the fuselage and then fitted the floats. Here’s were the second “oops” moment occurred. I impatiently rushed the float installation and soon had 6 points being glued at once, only to discover I didn’t have enough hands to hold everything together. I should have glued the attachments in pairs, letting each pair set up, before starting the next pair. You'd think I would have learned this sort of thing by now. Sadly, the resulting fit wasn’t very good, requiring some delicate filling, sanding and repainting.
Rigging the floats was a slow process. The EZ Line holds a static charge, and is either repelled or attracted to everything. The little attachment eyelets seemed to uniformly repel the thread. It took a while but was finally complete.
Photo 1 - New float holes drilled. They are very large and obvious.
Photo 2 - Floats installed. I think it's mostly straight and level.
Photo 3 - Float rigging complete. An eye crossing experience.


With the floats rigged, it was time to add the red warning strip and paint the rubber nose bumpers at the front of the floats.
Now on the home stretch, I removed the window masks. I lightly scored around the masks, hoping to get a cleaner separation. It mostly worked, though there were a couple spots, most notably the front windshield, that chipped and will require touch up.
The wings installed without issue. The underwing braces were installed while the wing to fuselage joints were still drying, and the plane was set aside for the glue to set properly. Returning the next day, the plane looked like it was trying to raise its a arms over its head! The wing braces were too long, causing the wings to take on an unnatural dihedral. The braces were carefully cut off, the wings set to the correct dihedral, and the shortened braces reinstalled.
Final details, such as the prop and pitot were added, and the plane was complete. The build proved more challenging than expected, but I am happy with how the plane turned out.


1/144 Lockheed Martin RCAF CC-130J-30 Hercules
With two kits complete, it is time to start something new.
The RCAF purchased 17 stretched J model Hercules, delivered between 2008-2012, to replace aging E and H model planes. The new planes were immediately pressed into service supporting Canadian Forces activities in Afghanistan.
The aftermarket decals from Above & Below Graphics included a solid description of the new Hercs. Rather than reinvent the wheel, it is included below.

The aftermarket decals are for serial 130614, which I took extensive pictures of after the 2016 Cold Lake Airshow. That’s Nicholas walking towards the plane.

The fuselage went together without issues. The kit includes a rudimentary cargo area interior but nothing for the cockpit. Weight was added to the nose to prevent a tall sitter. The fuselage seams needed CA to deal with minor gaps, followed by sanding and rescribing.
The wings consisted of top and bottom halves, with the bottom inset into the top half. I know this is done to get a thinner trailing edge, but the pieces needed a lot of sanding to prevent a step. Once joined, Mr Surfacer was used to fill the rather large under wing gap.
The engines consisted of two halves, split vertically, and a separate front. Fit was generally good, but even the minor sanding needed removed the panel lines, requiring then to be rescribed.
Photo 1 - Fuselage joined. The black marks are CA used to fill small gaps.
Photo 2 - Mr Surfacer used to fill the under wing joint.
Photo 3 - Wind screen installed and masked


That’s it for another update. With tthe move just over a month away, I have a suspicion this may be the last update for a while. So take care, stay safe, and I will see you back here come the fall!


Comments