May 8 - Perhaps it's finally spring!
- paddleriver
- May 8, 2022
- 8 min read
Happy Mother's Day! It has been a relatively quiet day at our house. Nicholas got in really late last night so everyone slept in. Except Marie, who seems to be Copper's favourite target when they want out in the morning. Nicholas made raspberry cream cheese filled french toast for breakfast, while Christine assembled the sewing chair we got Marie for Mother's Day. Daniel, bless his thoughtfulness, took flowers to his Grandmaman, who would otherwise have been alone. It is wonderful when you get to that point in life where you can watch your kids and rejoice on what good people they became.

Copper continues to do well. As Nicholas described it last night, Copper is a puppy for two minutes a day and sleeps the rest of the day.
It has otherwise been a busy couple of weeks since the last update, translating into limited time at the workbench. Even when you are retired, the days aren't always long enough. It appears that spring may finally have arrived, and the snow has melted in the back yard. Summer tires have been installed on all vehicles, Christmas lights have been taken down, and yard clean up is in full swing. Four dogs meant that dog poop clean up was a major exercise.
I also had a couple days in Edmonton and was able to visit some of my favourite stores. If you ever get the chance, you must visit Maple Airbrush. Supplies.https://www.mapleairbrushsupplies.com A great store for paint, airbrush parts, and now they are carrying general hobby supplies. They do mail order but it is so much nicer to visit in person. I picked up some new paints to try, including a pearlescent purple, for some future projects.
My 3D resin printer and supplies has been arriving in bits and pieces. I ordered the printer last October off of Kickstarter, a website that allows companies to crowdfund projects. The printer was over subscribed, raising enough money to immediately start production. Delivery was originally October 2021, which slipped to December, then February and most recently to March/April. The wash and clean station arrived earlier this week, and the printer itself showed up Friday. Hopefully the resin arrives soon so I can try the printer out. I haven't had much time to check these out, other than to take them far enough out of the boxes to confirm what they are. I am surprised at how large they are, and now need to figure out where to set them up.
The kids have finished their schooling for the term. Christine made the Dean's List (Again! Way to go!), and has already started work at the golf course. Her work days are long, so we don't really see much of her anymore. Nicholas got home Saturday night - technically it was Sunday morning. We haven't seen him since early February, when he headed back to school in Ottawa. It is good to have him home for the summer. He has a day to recover from his late night arrival before starting his summer job with the Energy Resource Board. While down south, I was able to visit Daniel and have dinner with him a couple times. He is having the time of his life, greatly enjoying his co-op term at Suncor, and life in the city.
DC-6
The DC-6 continues to teach me things I thought I knew:
The bottom wing joints have been problematic, and have been reworked multiple times. Hindsight says I should have joined the three bottom sections, into a full span wing, before joining the top and bottom halves. I believe this would have produced a stronger, more even joint.
Phantom cracking along the top of the fuselage has been a problem. After twice unsuccessfully using plastic cement to reglue cracks, superglued was finally used on the problem area. It's the equivalent of the atomic option, and meant lots of sanding and rescribing followed.
Careless - read ham fisted - handling of the plane has caused several problems. The worst was when I partially dislodged part of the clear window inserts along the rear starboard side. I was able to pop a smaller window out, insert a coat hanger, and lever the windows back into position before applying glue. It isn't perfect but it should work. The force needed tp pop the windows back badly damaged the the smaller window opening. An initial effort to repair the opening was not successful and it became necessary to fill the window completely in. A decal will be used to represent the window.
I haven't found an effective way to deal with static. Fluff and sanding debris stick tenaciously to the plastic and cause problems with primer and paint. I am also wondering if static may be partially responsible for patches of coarse primer that mysteriously appear on just parts of the plane.
The Vintage Flyer decals came with vinyl masks for the cheatline stripe. I wasn't originally planning to use them until I properly read the decal instructions. The tail of the letter f in "Pacific" drops down into the window striping, and the masks include the right sized cut out. Hopefully the cut outs have been set in the right place so that the windows line up properly.
Photo 1 - The white upper fuselage is complete, with the masks in place and the white areas taped. The tail masking was revised after the picture was taken to allow for a silver leading edge on the vertical stabilizer.
Photo 2 - Black primer was used as a base coat for the silver. The masking on the tail has been adjusted.
Photo 3 - An area of coarse primer on the wings. I think this is at least partially due to static. It isn't possible to get a wet coat of paint laid down when this happens. Instead, it builds very fine ridges that simply get larger as paint is added. This area had to be sanded to get a smooth surface.
Photo 4 - The silver areas are completed. Some sanding is necessary to remove bits of fluff, then a final coat of silver will be sprayed.
Photo 5 - Light sanding to remove fluff and smooth out the paint.
Photo 6 - Same area as Photo 6, repainted with silver.


If the weather is as cold and wet as forecast, it should be possible to get the decals on before the next post.
Bell X-1
With the Cosmo complete. it is time to start on another model. This kit was purchased several years ago using a gift certificate from Dave. It doesn't fit the Canadian designed/built/service theme, but it certainly is a significant milestone in aviation.
Googling the plane for info found several very good builds on the modelling forums, and a number of pictures. By chance, a series of pictures from the Smithsonian was stumbled upon, and proved to be a treasure trove of information and details. Eight five detailed, high quality pictures of the entire plane - see the link. https://airandspace.si.edu/collection-objects/bell-x-1/nasm_A19510007000
The kit is relatively simple, but as a Profipack boxing includes resin wheels, a small photoetch fret with seatbelts and instrument panel, and canopy masks. There are three decal options, but the only choice is the all orange "Glamourous Glennis" flown by Chuch Yeager when he broke the sound barrier in 1947.
Some shots of the kits parts.


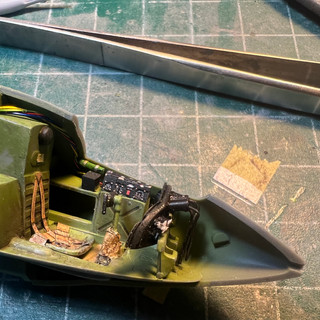
Work started with the cockpit. The port sidewall panelling was opened with a moto-tool to better match the Smithsonian pictures. A "black box" and small green oxygen bottle, both very visible in the cockpit pictures, were scratch build and added to the top of the side wall panel. The seat belts, and a "canvas cushion" fashioned from tape, were weathered using brown oil paint. The canvas cover at the base of the control stick was made from tape, covered in filler, then painted to look like canvas.
The two forum builds I found both added details to be back of the instrument panel. I have seen "serious" modellers do this on other builds, and always scratched my head why you make this effort as it rarely can be seen. The Smithsonian pictures came to the rescue, as they very clearly show the the back of the instrument panel, consisting of the gauges and cabling, is very visible thru the canopy. Gauge bodies were made from small diameter styrene rod, drilled out and then fine wire inserted to represent the cabling. Drilling the holes was an exerise in patience - or impatience as the case may be - as I initially tried to do it before the glue had set fully and ending up making a mess. The botched gauges were sliced off, new ones fabricated, and allowed to dry properly before holes were successfully drilled.
The instructions showed adding the instrument panel thru the cockpit openings after the fuselage halves were joined. Fortunately the instrument panel was test fit before gluing the fuselage together, where it became apparent that the gauge bodies and cabling made the instrument panel too big to fit thru the fuselage opening. The panel was therefore glued in place before the fuselage halves were joined.
The instructions suggested adding weight but provide no info on how much. The fuselage, wings and horizontal stabilizers were dry fit, held together with tape, and weight added until the plane balanced. A decision to test fit the canopy resulted in a moment of panic when the canopy couldn't be found. There wasn't that much in the box so there wasn't anywhere to hide! The box contents were emptied on the bench and sorted thru piece by piece. Huge relief when the canopy was found, in its own separate baggie, hiding inside the decal baggie. The relief was short lived, when it was realized that the canopy was cracked and had separated into two pieces. In desperation, liquid cement was wicked at the edges and the canopy dipped in Future. The crack remained very visible but the hope is it is less visible once the framing is painted.
The fuselage halves went together without any issues but needed a little filler along the dorsal spine. The wings and horizontal stabilizers proved to be a loose fit that also needed a little filler.
Photos 1-4 - cockpit details.
Photo 5 - Cabling is very visible in the Smithsonian photos along the port sidewall. This was added by twisting multicolour craft wire together in to a strand and gluing into place. It is almost invisible unless you are looking up thru the entry door, which is how it is seen in the pictures. The small green oxygen bottle is just visible to the right of the cables
Photo 6 - details of the rear of the instrument panel
Photo 6 - Model ready to test fit the canopy
Photo 7 - The canopy after being dipped in Future. The crack is visible as a white line, running from the attachment stub to the front of the canopy. There is a lot of black framing so hopefully it is less obvious after painting.


Next up
There is a small pile of kits next to my workbench, piled up with the intention of being the next builds. They include a 1/144 RCAF C130-30J Hercules, a 1/144 RCAF C130E to be painted in the white and silver scheme, a 1/144 RCAF Polaris to be painted as the Prime Minister's plane, a 1/144 RCAF Husky (707), and a 1/72 F-35A now that Canada is going to purchase them. Dave recently tossed this "careful" planning into chaos, when he sent me a picture of a yellow Otter, and suggested I do an Otter or, better yet, a Norseman in red and yellow like the one in the Suncor Energy Centre lobby. I have kits of both planes, and I actually know where the Otter is, but the Norseman is buried deep in the stash. I have markings for a CP Airlines Otter that would look fantistic, so perhaps this will get added to the top of the pile. As I recall, the Otter shares a box with a Beaver, to be done in PWA markings, so perhaps it will be two float planes.
Dave also sent pictures of a Star Trek NCC-1701 Enterprise that he recently finished and had signed by William Shatner. I have a couple of kits of the Enterprise, both the original series and as the NCC-1701-A movie version. His build looked fantastic and increased the desire to build an Enterprise. I had picked up a bottle of pearlescent purple paint at Maple Airbrush that would be perfect to create the metallic sheen under the kit's Aztec decals. So perhaps it will also be moved to the top of the pile.
That's it for now. Take care and stay safe.


Comments