Mid May 2023
- paddleriver
- May 21, 2023
- 11 min read
It has almost been a month since the last blog update. Strangely, it doesn't seem that long or that much has happened.
After a few days of respite, the wildfire smoke is back today. I had plans to work in the yard but it is too smokey to be outside for any length of time. Yesterday was better, so Nicholas and I got out to play a round of golf at Vista Ridge. And I got Marie out last Thursday for her first ride on her new electric bike.
My stomach issues seem to be mostly over, and I am obviously pleased about that. It wasn't a very pleasant experience but proved an exceptionally effective way to lose weight.
The kids are all finished school for the term and have started their respective summer jobs. We celebrated Christine's graduation with a lawn sign to announce to all the neighbours that she had graduated! Last Friday was Christine's 25th birthday, (25! How can she be 25?!?). She had to work that day so we did a joint graduation/birthday dinner at The Keg last Thursday, and a birthday dinner with cake at home on Saturday. Happy birthday Christine!

Daniel was in Adrian, Michigan this week for his UofA team F1 car competition. The team had a lot of late nights to get the car ready, including a couple of all nighters. The car was shipped first, with the first team trailering it straight thru to Michigan. Daniel was part of the second group, which stayed behind a few extra days to finish off some parts, before they also drove straight thru to Michigan from Edmonton, with four of then taking shifts driving 6 hours each. We haven't heard much from him over the last week, other than he was having a blast. A short text this morning indicated that they had some mechanical issues with the clutch and brakes that disqualified them from final judging. He is obviously disappointed but said it was a fantastic experience and he learned a lot. They head back home today, so we are hoping to soon hear more of his trip.
The competition actually involves 2 cars, with the gas powered car currently being judged. A battery electric car will be judged in a couple weeks, with the team repeating the entire process to get the second car to Michigan.


And I have to include a short video Daniel sent recently. He has been weight lifting seriously for a couple of years, and once a month he does a "personal best" session. The video below shows him lifting three plates. He explained to me a couple weeks back that two plates is considered good. Not many people achieve three plates. For those that don't know what a plate is, like I didn't, three plates is an incredible 315 lbs!
Marie attended the quilting guild general meeting last week and got elected VP! They actually tried to convince her to stand for president, but she wasn't ready to take that big a step. Congratulations to Marie! We expect big things!
The puppies are doing well and Ember continues to grow. She is now officially 8,8 lbs measured at the vet. She is almost as tall as Shadow, still slightly shorter than Luna, but only a third as heavy as Shadow. Even as a featherweight, she rules the roost and generally gets her way with Riley and Luna. She is still learning to walk properly on a leash, and not bark at the neighbor dogs on the other side of the fence. She recently had her ears unglued and we learned that she really likes head scratches.

I was in Calgary at the start of May, visiting friends and both Mothers. I brought home my Dad's hobby tools, his old hobby desk, and the last model he was working on. Nicholas is working thru the three boxes of tools to build his personal hobby toolbox. I have now set up my Dad's old desk as my new hobby desk, replacing a 35ish year old Ikea desk that was on the verge of falling over.
Marie is on the way to Calgary today, as her Mother has a doctor's appointment on Wednesday. She is planning to come back on Friday, so we are on our own for a few days. I will experiment a little to see if Ember is old enough to leave alone upstairs while I spend some time downstairs at the model bench.
Anson
The Anson has sat for the last month, waiting until my stomach got better and my desire to build models returned. A week ago, during a early spring heat wave, I retreated to the basement and put the Anson back on the bench.
The first order of business was to remove the canopy masks. The masks had been on for at least 2 months, and I was a little worried that they wouldn't come off, or they would leave glue residue that would be hard to clean. I need not have worried, as the masks came off cleanly, but I was disappointed to see frosty spots in several places. Thankfully the frostiness went away over the next couple days, so the windows were nice and clear to show off all the detail in side.
The Anson horizontal stabilizers were supported by rigging off the vertical stabilizer. The kit included "divots" to simplify rigging installation and the necessary rigging was installed with a minimum of fuss using EZ Line elastic string.
The kit also allows for the installation of control cable wires, from the appropriate control horns to all the movable surfaces. This isn't something I had seen before, and I initially debated ignoring it. I didn't relish the idea of using elastic thread, as I thought it would be too floppy and difficult to install. I instead opted to stretch some sprue to the appropriate diameter, and then carefully cut and install the cables. It was very slow work, but the results are very pleasing.
With the rigging and wiring in place, all that was left was to add the props and all the little "sticky out bits". And with that, the model was done.
Photo 1&2 - Canopy masks removed
Photo 3 - Aileron control cable rigged
Photo 4 - Tailplanes rigged
Photo 5 - Done!


This was a much longer build than I had anticipated but I thoroughly enjoyed it, and am very happy with the result. Now to get some pictures of the finished model.
MiG-21
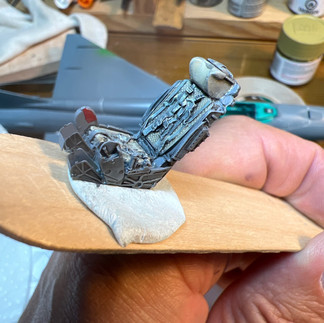
Most of the major pieces have now been added, with the remaining work being the cockpit, the landing gear, and the armament. I generally prefer to leave the landing gear and weapons off until after painting to avoid damage. So the logical place to focus was on the cockpit, finishing it up, and then preparing the model for painting.
The kit seat is a mini kit all in itself, consisting of over 20 pieces. Dave had very thoughtfully included resin seats as part of the present, so the kit seat was put aside and the resin seat pulled out. After cutting the resin seat free of the casting block, it was washed in soapy water to remove any casting oils and mould release agents. Next was to fabricate and install the foot supports from the provided photoetch brass. They were easy to assemble but a royal pain to glue onto the front of the seat. With them in place, the seat was painted in a light grey as a primer.
The MiG-21 seat isn't very colourful. The seat frame is a light grey. The seat cushions are a khaki grey. And the seat harnesses are a light blue grey. So it's essentially three different shades of light grey. Even after painting, the details didn't stand out. A dark wash was liberally applied in the hope of providing some depth and bring out the details. The wash added depth but also tended to blend all the colours even further together, so I dry brushed highlights back into the seat and harness details using a very light grey. The result looks quite convincing when placed in the cockpit.
Photo 1 - Resin seat printed in grey
Photo 2 - Painted, washed and dry brushed. Not a very colourful seat.
Photo 3 - Seat temporarily in place to test fit
Photo 4 - Windscreen installed. Canopy dry fit
Photo 5 - Underside painted light blue
Photo 6 - Underside masked
Photo 7 - First top color applied


The instructions call for the top to be painted in middlestone nd dark green. The brown is definitely middlestone, but clearly lighter than the instructions color drawings. The kit painting instructions can be seen in the background of Photo 7. I haven't been able to find any pictures of this plane, it a different Eduard kit shows the lighter brown, so I will not change the colour.
1/24 Tamiya Volkswagen Kharmen Ghia
My father had a Volkswagen Kharmen Ghia when my parents were first married. It was a small, sporty four seat, two door that was fun for a young, newly married couple. It was not very practical with a new born, but they managed to make to work. With some effort, my bassinet could be snuggled into the space between the front seats. It simply didn't work when a second new born arrived a year later, and my father regretfully sold it for a more practical family car.
My parents tell many stories about that little car, but the one that always seems to come out was the time they travelled from Camrose to Barrhead, with me wedged into my bassinet. It was winter, and the defroster was going as hard as it could to keep the car warmish and the windows mostly free of frost. I was sick, and fussing in my seat. Fussing changed to crying, and then to being violently sick. Projectile vomit splattered against the front window, running down the windshield and into the heat vents. It was too cold to turn off the heat, so my parents were forced to endure the smell of warm vomit, coming out of the defroster, for the rest of the trip. My father tried to clean the vents but a vomit smell always appeared whenever the heat was turned on.
I had been searching for many years, without success, for a model of the Karmen Ghia . There were actually three models available, all long out of production, and typically commanding a step price on the online auction sites. One day, while browsing eBay, I found a reasonablly priced kit that was, remarkably, located in Edmonton. A bid was quickly placed and fingers crossed. Luck favored me this time, and I won the action without having to increase my bid. The kit arrived just in time to wrap up and present to my Dad for Christmas 2021. The kit was a huge hit, and he happily sat all day, reading the instructions, and fingering the plastic sprues.
My father started the kit mid 2022. He had stopped building plastic models a few years earlier, switching over to wooden ship models. He no longer had access to a spray booth, and was worried about his ability to paint plastic models using a brush. Earlier in 2022, he had built a couple of 1/72 Airfix kits, a P-40 and a Hurricane, as a test of his brush painting skills, and was happy with the result. It was enough to get him started on the Karmen Ghia. Progress was slow but by fall 2022 he had the chassis, engine and interior assembled and painted. It looked pretty good.
My father suffered a couple of health setbacks, starting in September 2022, that put him in hospital a couple of times. Each time he was released, he vowed he would get back to the Karmen Ghia, but he never did. There was no progress thru the fall of 2022.
My parents live in a two bedroom apartment. A shared bed was in the larger bedroom, while my father's hobby desk and computer desk were in the smaller bedroom. October 2022, it was decided to place a bed in the 2nd bedroom. The room wasn't big enough for a bed, a hobby desk and a computer desk, so the hobby desk was packed up. I carefully packed up most of my father's hobby tools and supplies, but the Karmen Ghia was kept aside, with necessary paint and tools, should he decide to restart the kit.
My father's health continued to deteriorate and he passed away at the beginning of February 2023. I volunteered to take the Karmen Ghia home and finish it on my Dad's behalf. The kit was carefully packed up during a Calgary visit in May 2023, and taken back to Fort McMurray.
With the Anson finished, and the MiG-21 progressing nicely, I pulled the Karmen Ghia out onto the bench and had a look. My Dad had essentially finished everything except for painting the body shell, and then installing the body to the chassis. The interior had been neatly brushed painted, with the upholstery a camel brown and the floor and dash in flat black. The dashboard gauges looked like the decals hadn't settled properly, so I tried a little decal solvent to see what would happen. The decal solvent had no affect, so I went back to the instructions only to realize that the kit didn't include decals for the dash gauges. The instructions clearly showed that the gauges were supposed to be painted. Staring at the instructions harder, I realized that Dad had cut out the dials from the painting instructions and glued them to the dash. A simple but effect means to add detail!
A quick look at the shell determined Dad had glued the trunk into place but hadn't cleaned up the joint. Out came some sanding sticks and the shell was cleaned up and paint ready after a few minutes.
Out of curiousity, I decided to test fit the body to the chassis. This sort of thing is generally pretty obvious but I wasn't able to figure out how to slip the body over the rest of the chassis. Checking the instructions confirmed my approach was correct, but I still couldn't make it fit. Using a metal file to pry the shell open a little finally got the shell seated.
It was immediately apparent that something wasn't right. The wheels sat too far forward in the wheel wells, and the back end was too high. Separating the body and chassis was even more difficult than putting them together, and my efforts resulted in the deconstruction of several pieces before the body was finally removed. The chassis was clearly too long. I sat with the instructions and went thru all the steps to try and figure out what was wrong. I came to the conclusion that the rear of the two piece chassis wasn't seated properly, ending up about 3 mm farther back than it should have been. My Dad had used CA to assemble the kit, so it was possible to further deconstruct it thru careful application of pressure. Ten minutes later and the chassis was back into two pieces, the parts cleaned up, and a test fit confirmed the correct location for the chassis pieces.
I begin to think about how best to approach reassembly. The review of the instructions showed that Dad hadn't followed the recommended colour call outs, with most of the underbody and engine painted flat black, even though he appeared to have the necessary colours. The kit included an opening trunk so the engine details could be seen, but Dad had very securely glued the trunk closed, and I wasn't going to try and free it. It meant that most of the engine detail would no longer be seen, except when viewed from underneath. With the model apart, I have access to much of the details, and could adjust and repaint the pieces to match the recommended colours. Or I could simply leave things as Dad had done it, reassemble the parts, and paint the body shell. I tend to believe that Dad would be pleased if I made fit and colour adjustments per the instructions, so that the model was closer to the real thing.
I had brought home all the paints I thought Dad had been using. Deconstruction had damaged some of the camel brown colour on the doors, necessitating a touch up. I grabbed the brown paint and was surprised to discover it was much too dark. It was the only brown colour in the box, so I either missed packing the correct paint, or Dad had mixed a custom colour. A little experimenting was able to mix a convincing colour match and the touch up was finished without further trouble.
Photo 1 - After "deconstruction"
Photos2&3 - Engine compartment assemblies repainted and reassembled
Photos 4&5 - Reassembled and back together as Dad had left it
Photo 6 - Body shell primed


The build isn't going to be fast, but look for it to join the regular blog updates in the next month.
And that's if for another blog. Stay safe everyone. Safe travels to Marie, Daniel and Dave.


Comments