Third times a charm
- paddleriver
- Sep 6, 2021
- 7 min read
A longer update today to catch up on some things.
CL-44
Third time? Well, perhaps it is the fourth time. That is how many times I repaired the paint cracking on the wings. This kit has continued to challenge my skill and patience.
As I concluded at the end of the last blog entry, I had repaired the hairline cracking on the wings, and applied a clear coat. After sitting for a couple days, a new and very large crack appeared in the port wing silver paint. Once again, nothing to do but sand it out and repaint. This time I sanded down to bare plastic, repainted with Alclad Primer, let the primer cure for a week, and then repainted. So far it has worked with no new cracks appearing. (Photo 1 shows the cracks, Photo 2 shows the repaired wing,
Next, I brushed a layer of Aqua Gloss over the cargo door decal to protect it. The decal bedded down nicely under the clear coat and everything looked great when I turned off the light for the night. Things didn't look so good a couple days later. There were little specks and bumps all thru the area I had clear coated. Out came a 6000 grit sanding pad and the bumps were very gently sanded down. In the process, I damaged the bottom of the man door decal, and had to replace a short section with a spare. Another over coat with Aqua Gloss and things looked better. (Photo 3)
I had used Alclad Light Sheen as my clear coat, My previous experience has been that it dries smooth. This time it dried with a rough texture, and almost had a frosted appearance. I got out the plastic polish and spent a couple hours gently polishing the clear coat to restore a smooth, slightly shiny appearance.
While polishing the paint, I broke off my jury rigged main landing gear off. Some choice words and superglue restored everything. On the other main gear assembly, I added a couple of short lengths of brass wire to reinforce the broken wheel bogie. A little silver paint and it was as good as it was going to get.
While sitting at the end of a modelling session, admiring the almost complete model, I had a terrible realization. Easily the most bone headed error on the kit. Nothing I could do about it either. See if you can spot the error in the finished pictures. You can't unsee it once you figure it out.


Here is the finished model. Not perfect by any means. But I now have my Flying Tiger!


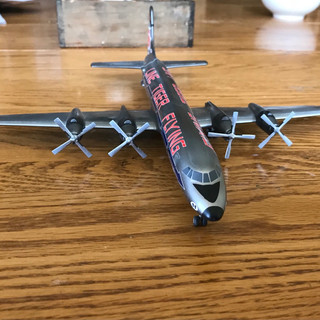


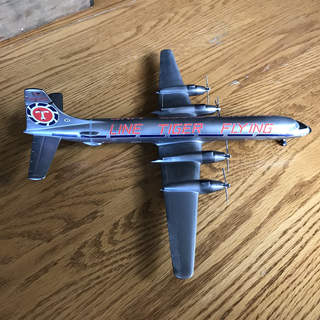


Have you spotted the mistake yet? Look at the starboard side lettering. It's supposed to be Flying Tiger Line.
Northstar
With all the drama on the CL-44, it has been nice to be able to work on the Northstar.
The main wings needed some sanding to get them to fit. I put some blobs of blue tack at the front and back of the fuselage opening to give something flexible to set the wing height. 5 minute epoxy was used to glue the wings to the fuselage. This left some large gaps between two wing sections that needed filler. Fit along the to, between the wing and the fuselage, was pretty good, needing a little Mr. Surfacer to even things out. A little more sanding and the model is ready for primer.
Photo 1 - the large gap between the wing sections, and along the front and back wing to fuselage joints.
Photos 2 & 3 - The joint between the top of the wing and fuselage is pretty good. A little Mr. Surfacer was all that was required.
Photo 4 - the bottom seam, cleaned up, rescribed and ready for primer
Photos 5 & 6 - the top seams cleaned up and ready for primer


Before priming, I temporarily inserted the metal gear and props to test the weight. It was immediately apparent that I had not added enough nose weight. I debated drilling a hole in the bottom of the fuselage to try and add more weight. A little experimenting showed that a lot more weight would be needed to avoid a tail sitter. The full size plane had a similar problem and actually used a pole, inserted under the tail, to prevent tail sitting while loading. I didn't think I could get enough weight into the fuselage and so decided I would need to create a model version of the pole
Hawker Typhoon
Completion of the CL-44 opens up space for the next build. Continuing the theme of building models received as gifts, I have selected a 1/48 Hasegawa Hawker Typhoon 1b. I received this kit in 2008 as a Christmas present from my parents.
Type History
The Hawker Typhoon (Tiffy in RAF slang) was a British single-seat fighter-bomber, produced by Hawker Aircraft. Intended as a Hurricane replacement, it was designed around the Napier Sabre, most powerful engine then available. The design initially showed initial, but a number of faults quickly became apparent, and the plane gained a bad reputation. The thick wing limited high altitude performance, and the tail had a disturbing tendency to separate from the fuselage during high-speed dives. The Sabre engine also experience a number of developmental challenges, with the most significant being a tendency to leak carbon monoxide into the cockpit, rendering the pilot unconscious. These design issues caused significant program delays, and the aircraft came close to being cancelled. It was saved by the Luftwaffe’s introduction of the formidable Focke-Wulf Fw 190 in 1941, as the Typhoon was the only RAF fighter capable of catching it at low altitudes.
Most of the design issues were eventually resolved, and the Typhoon became established in roles such as night-time intruder and long-range fighter bomber. From late 1942, the Typhoon was equipped with bombs and from late 1943, RP-3 rockets were added to its armoury. With those weapons, and its four 20mm Hispano autocannons, the Typhoon became one of the Second World War's most successful ground-attack aircraft. (from Wikipedia. Full article here Hawker Typhoon - Wikipedia)
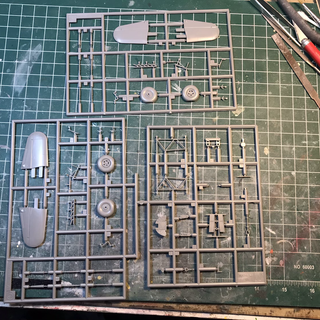
The kit
This particular kit was produced in 1999. Reviews were generally positive, noting the accurate dimensions, good surface detail, a decent cockpit, and recessed panel lines. The main weakness is considered to be the use of fuselage inserts, allowing a single mould to be used to model both the car-door version and the bubble top version. The inserts apparently don't fit well, leaving either a step in the fuselage, or a gap along the top seam. Forewarned is forearmed.


The extras
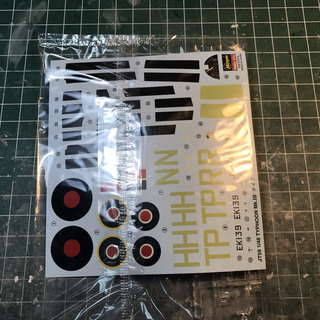
I had bought a set of aftermarket decals from Arrow Graphics in 2000, and dug them out in anticipation of using them. That started some interesting research, but more on that in a minute.
Digging thru my model magazines found 2 build articles. Both suggested that the kit seat as inaccurate. I was already planning an order from Hannants, so took a look at was what available. That lead to a full replacement resin Aires cockpit, as it was cheaper than buying an Eduard resin seat. I decided to get a set of turned brass cannon barrels from Master, as these are so prominent on the real plane. Finally, because they were on sale and remarkably inexpensive, I got a set of resin exhausts, and an updated set of decals.


The research
The exploits of RCAF Typhoon pilots were legendary. Imagine my surprise when I discovered that the RCAF didn't actually have any Typhoons. Searching Canadian Military Aircraft Serial Numbers (rwrwalker.ca) found that all Canadian Typhoons were owned by the RAF, and provided for use by RCAF squadrons. So the RCAF used Typhoons but didn't officially own any.
A little more research found that RCAF Typhoons belonged to No. 143 Wing RCAF, part of the Royal Air Force Second Tactical Air Force in Europe. The RAF Second Tactical Air Force was established on 1 June 1943. No. 143 Wing was established on 10 January 1944, comprised No. 438 Squadron RCAF, No. 439 Squadron RCAF, and No. 440 Squadron RCAF. Its purpose was to support the Canadian and British troops of 21st Army Group. So far, so good
Googling images of RCAF Typhoons yielded a lot of pictures. That's when I realized all the pictures showed bubble top planes ie. later models, and my kit was for the earlier car-door style. Back to Wikipedia to learn that the bubble top was introduced in November 1943. 143 Wing was established in January 1944, suggesting that the majority, if not all the RCAF aircraft would have been the later bubble style aircraft. It appeared I had a kit for a plane that apparently wasn’t used by the RCAF. What to do?
More google searches found an Aviaeology RCAF Typhoons decal set. The set contained 10 different markings for bubble top versions - and ONE version for a car door! F3-P was the personal mount of Wing Commander Robert Davidson. I finally had evidence of a Canadian car-door style Typhoon.
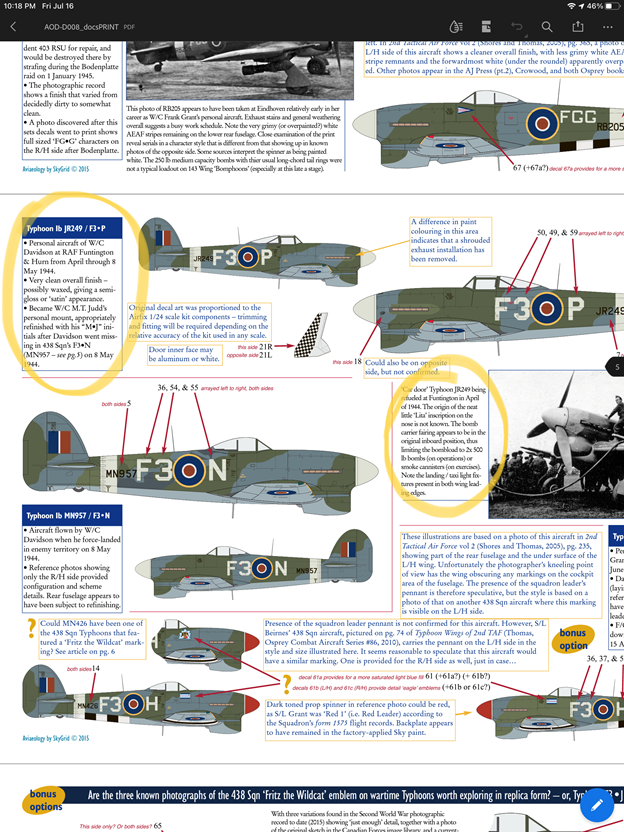
Continued reading of the Aviaeology info sheet found that Robert Davidson also flew a bubble top Typhoon, marked R-D. I had earlier learned that it was not unusual for squadron leaders to have their aircraft marked with their initials. This was the markings from my Arrow Graphics decal set. Reading the Aviaeology info more closely showed that Davidson apparently had 2 car-door style Typhoons - JP496 and JR249. Information on a Techmods sheet suggested that JP496 had previously been marked as HH-W, from when Davidson led 175 Squadron RAF. I now had two different Typhoons, with potentially four different marking options

That lead to the natural question of who was W/C Robert "Bob" Davidson? An article in the IPMS Canada Random Thoughts RT31-4 came to the rescue.


The article confirms the Aviaeology information that the car-door version had initially been coded HH-W before being repainted as R-D. The author chose to build his kit as R-D, with a number of useful pictures included.
I am not certain yet what version I intend to model. I am leaning to the R-D markings, as it appears to have the Wing Commander pennants (the markings under the cockpit). It would also likely have been the aircraft brought over to 143 Wing, making it a true Canadian service, Canadian piloted aircraft While I have decals for all three versions of these planes, I intend to try and paint as many of the markings as possible using home made masks.
I was surprised by how much I enjoyed this little research project. I had assumed it would be a simple exercise to find a prototype. Any previously research has been limited matching decals to a kit, or maybe finding a picture or two of the actual plane. My initial realization that my decals were for a later version resulted in an enjoyable bit of detective work.


Comments